Preface
This project is my first C++ project and it is my Master’s Thesis. I had 6 months to create this project. However, at least 2 months of this time was spent writing the actual thesis and not coding. About 3 months were spent coding with an additional month for benchmarking.
RocksDB
RocksDB is open-source and successfully used in many projects. For example in Apache Flink, state is maintained during calculations with RocksDB. RocksDB uses Log-Structured Merge-Trees under the hood. Log-Structured Merge-Trees avoid random writes by making all data immutable. This results in only sequential writes, which are significantly more performant. Of course, there are trade-offs for that. Reads become costlier, but this is balanced out by maintaining bloom filters and index structures. Also, there is redundancy. This is limited by compaction.
Meta uses three different distributed Key-Value Stores internally, which are all based on RocksDB. Each of these systems is fine-tuned for its use case. This adaptation to the use case is how Meta seems to extract maximum performance from their RocksDB-based systems. This is stressed by this paper, in which they describe how they developed specialized systems to track user behavior of their systems. For this to work, RocksDB has to be very adaptable. You can both adapt RocksDB in the data structures that are used internally and in the numbers. For example, you can pick from many data structures in which data is kept in-memory in the MemTable. You can also decide the maximum size of the MemTable, which is 64MB per default.
Based on this, we are assured that a distributed version of RocksDB can be very performant.
We will leave it at that here, but if you are curious about more details regarding RocksDB, you should check out the RocksDB Wiki.
UCX
Unified Communication X is an open-source project, which allows users to develop for Ethernet and Infiniband hardware at the same time. Code, that runs on Infiniband hardware, can also run on Ethernet, without any changes. UCX is backed by multiple companies, one of them being NVidia. UCX has lots of functionalities, but we won’t go into detail on it here. This project only utilizes the high-level API called UCP. With UCP we can transmit data between nodes in multiple ways. We only use UCP stream sends in this project, which allow us to send arbitrary data streams.
If you are curious about UCX details, you can check out the source code, which is linked at the end of this article.
Code Structure
/cpp
│   .gitignore
│   CMakeLists.txt
│
├───clion-run-configs
│       1server.run.xml
│       2servers - server 1.run.xml
│       2servers - server 2.run.xml
│       4servers - server 1.run.xml
│       4servers - server 2.run.xml
│       4servers - server 3.run.xml
│       4servers - server 4.run.xml
│       8-clients.run.xml
│       client CLI.run.xml
│       client.run.xml
│       Four Servers.run.xml
│       Two Servers.run.xml
│
├───src
│   │   CMakeLists.txt
│   │
│   └───distributed-rocksdb
│       │   CMakeLists.txt
│       │
│       ├───Client
│       │       CMakeLists.txt
│       │       DrdbClient.cpp
│       │       DrdbClient.h
│       │       DrdbClientApp.cpp
│       │       DrdbClientApp.h
│       │       main.cpp
│       │
│       ├───Common
│       │       ClientServerCommons.h
│       │
│       ├───JNI
│       │       CMakeLists.txt
│       │       JDrdbClient.cpp
│       │       JDrdbClient.h
│       │
│       └───Server
│               CMakeLists.txt
│               DrdbConnectionAcceptor.cpp
│               DrdbConnectionAcceptor.h
│               DrdbConnectionDeque.cpp
│               DrdbConnectionDeque.h
│               DrdbConnectionHandler.cpp
│               DrdbConnectionHandler.h
│               DrdbEndpointState.cpp
│               DrdbEndpointState.h
│               DrdbServerApp.cpp
│               DrdbServerApp.h
│               DrdbWorker.cpp
│               DrdbWorker.h
│               main.cpp
│               server_config1.txt
│               server_config2.txt
│               server_config4.txt
│
└───Valgrind
    ├───leak-check-full
    │       1000-put-client.txt
    │       1000-put-server.txt
    │
    └───leak-check-yes
            1000-empty-reads-client.txt
            1000-empty-reads-server.txt
The main content of our C++ implementation is in /cpp/src. There we have separate folders for the Client and the Server code. Additionally, we have some shared code between the Client and the Server in /cpp/src/Common. The folder /cpp/src/JNI contains the code required to access our project from Java. We will talk about that later. Apart from that, we tested our implementation with Valgrind and the results are in /cpp/Valgrind. Also, there are some helpful run configurations if you want to test the project yourself, in /cpp/clion-run-configs.
To make the code accessible from Java, we also have /java folder which looks as follows.
/java
│   .gitignore
│   build.gradle
│   gradlew
│   gradlew.bat
│   settings.gradle
│
├───gradle
│   └───wrapper
│           gradle-wrapper.jar
│           gradle-wrapper.properties
│
└───src
    └───main
        ├───include
        │       site_ycsb_db_JDrdbClient.h
        │
        └───java
            │   App.java
            │
            └───site
                └───ycsb
                    └───db
                            JDrdbClient.java
                            KeyValueStore.java
                            package-info.java
We use Gradle as our build tool and implement code to make use of the Java Native Interface and the Yahoo! Cloud Serving Benchmark. Both will be discussed later.
Architecture
The current implementation only supports static clusters. Each server needs to be given the ip-address and port of all other servers via a config file. All servers are connected with each other. By default, there is a single connection between each server, but the user can increase this amount. Each server has a static amount of Client Workers and Redirect Workers. Client Workers handle communication with clients and Redirect Workers handle incoming redirect requests.
Redirecting occurs, when a client requests an object, that another server is responsible for. Key responsibility is decided by their hash value. The current implementation uses murmurhash2, which is the default hashing algorithm in the used version of GCC. Each server has a unique id starting from 0. The responsible server is then calculated as follows.
responsible_server = hash(key) % server_count
So for example in a 4-node cluster, our nodes have the ids 0, 1, 2, and 3. Then for a given key, we would calculate hash(key), which is X. Then we calculate X modulo 4 and that value matches one of our server ids.
With all this being said, let’s look at an example to understand the current implementation.
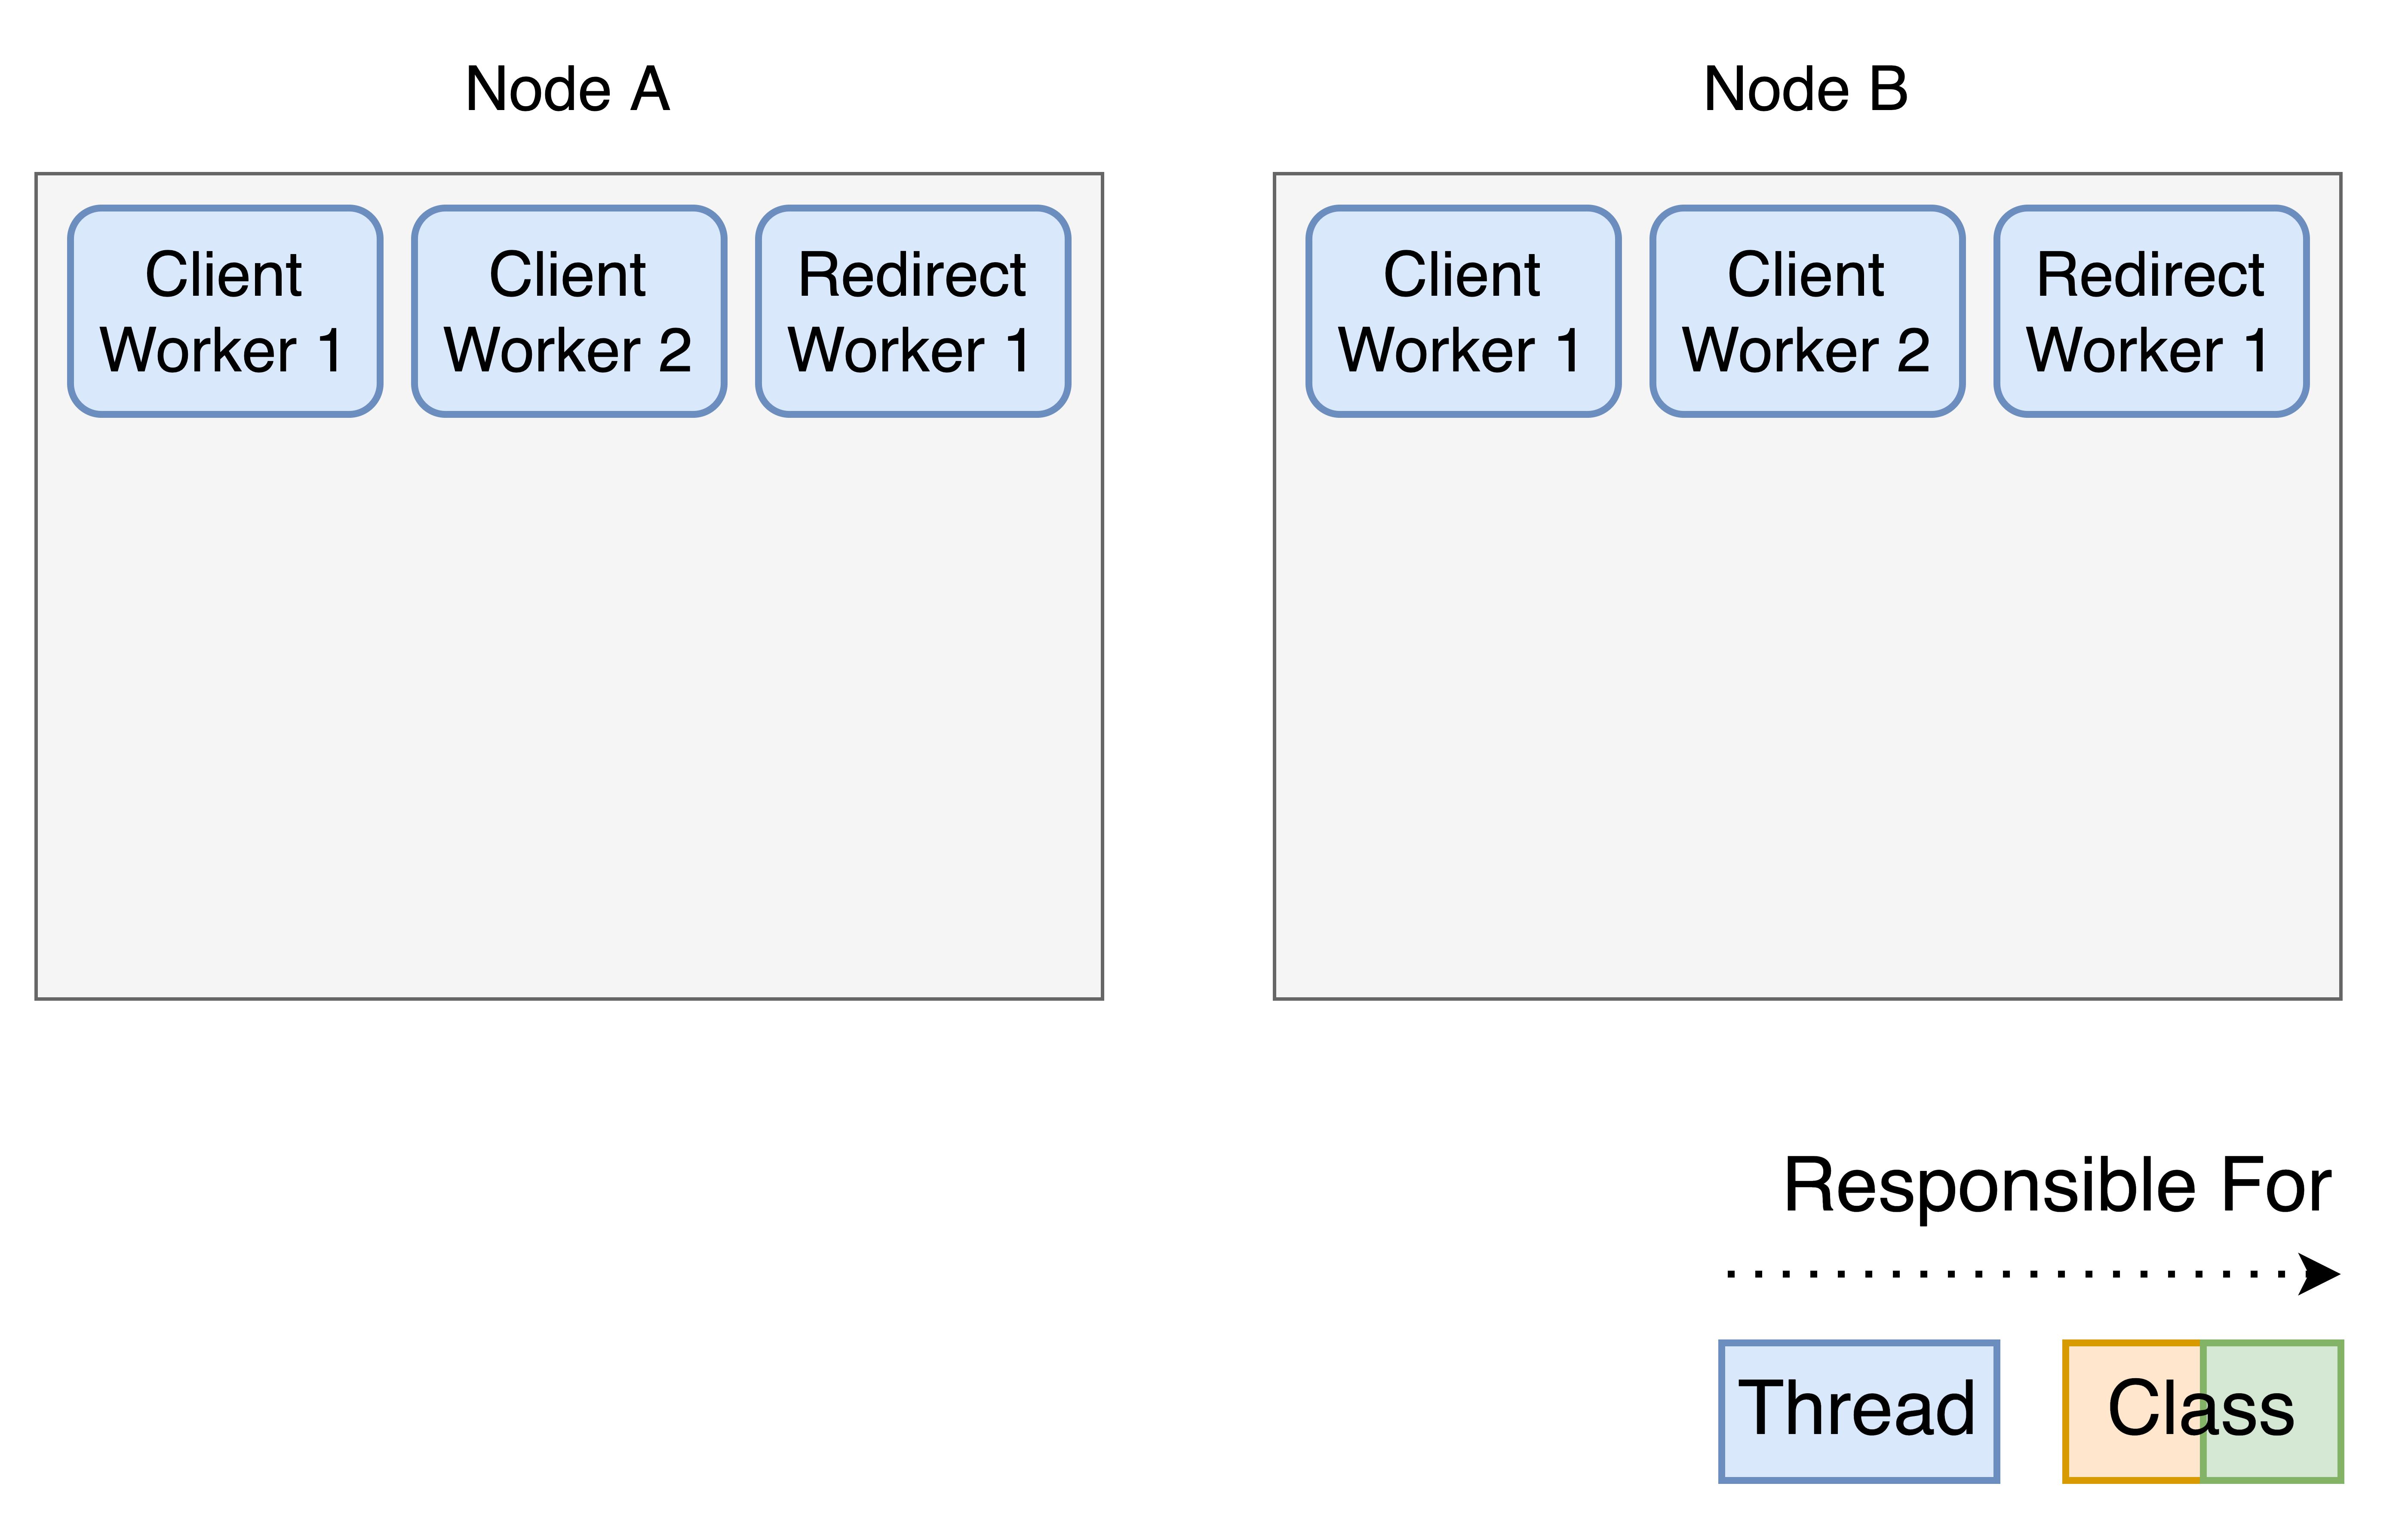
This is a two-node cluster. Right from the start, we have two Client Workers and one Redirect Worker on each node. Each of these Workers is a separate thread. Not depicted in this picture, are two further threads: ClientAccepter and ClientHandler. These two threads deal with new connection requests. Due to UCX’s design, accepting and handling have to be in separate threads if you want to be able to deal with multiple connection requests at once. These two threads are omitted for clarity. We will briefly discuss connection handling later.
Now the nodes will have to connect to each other.
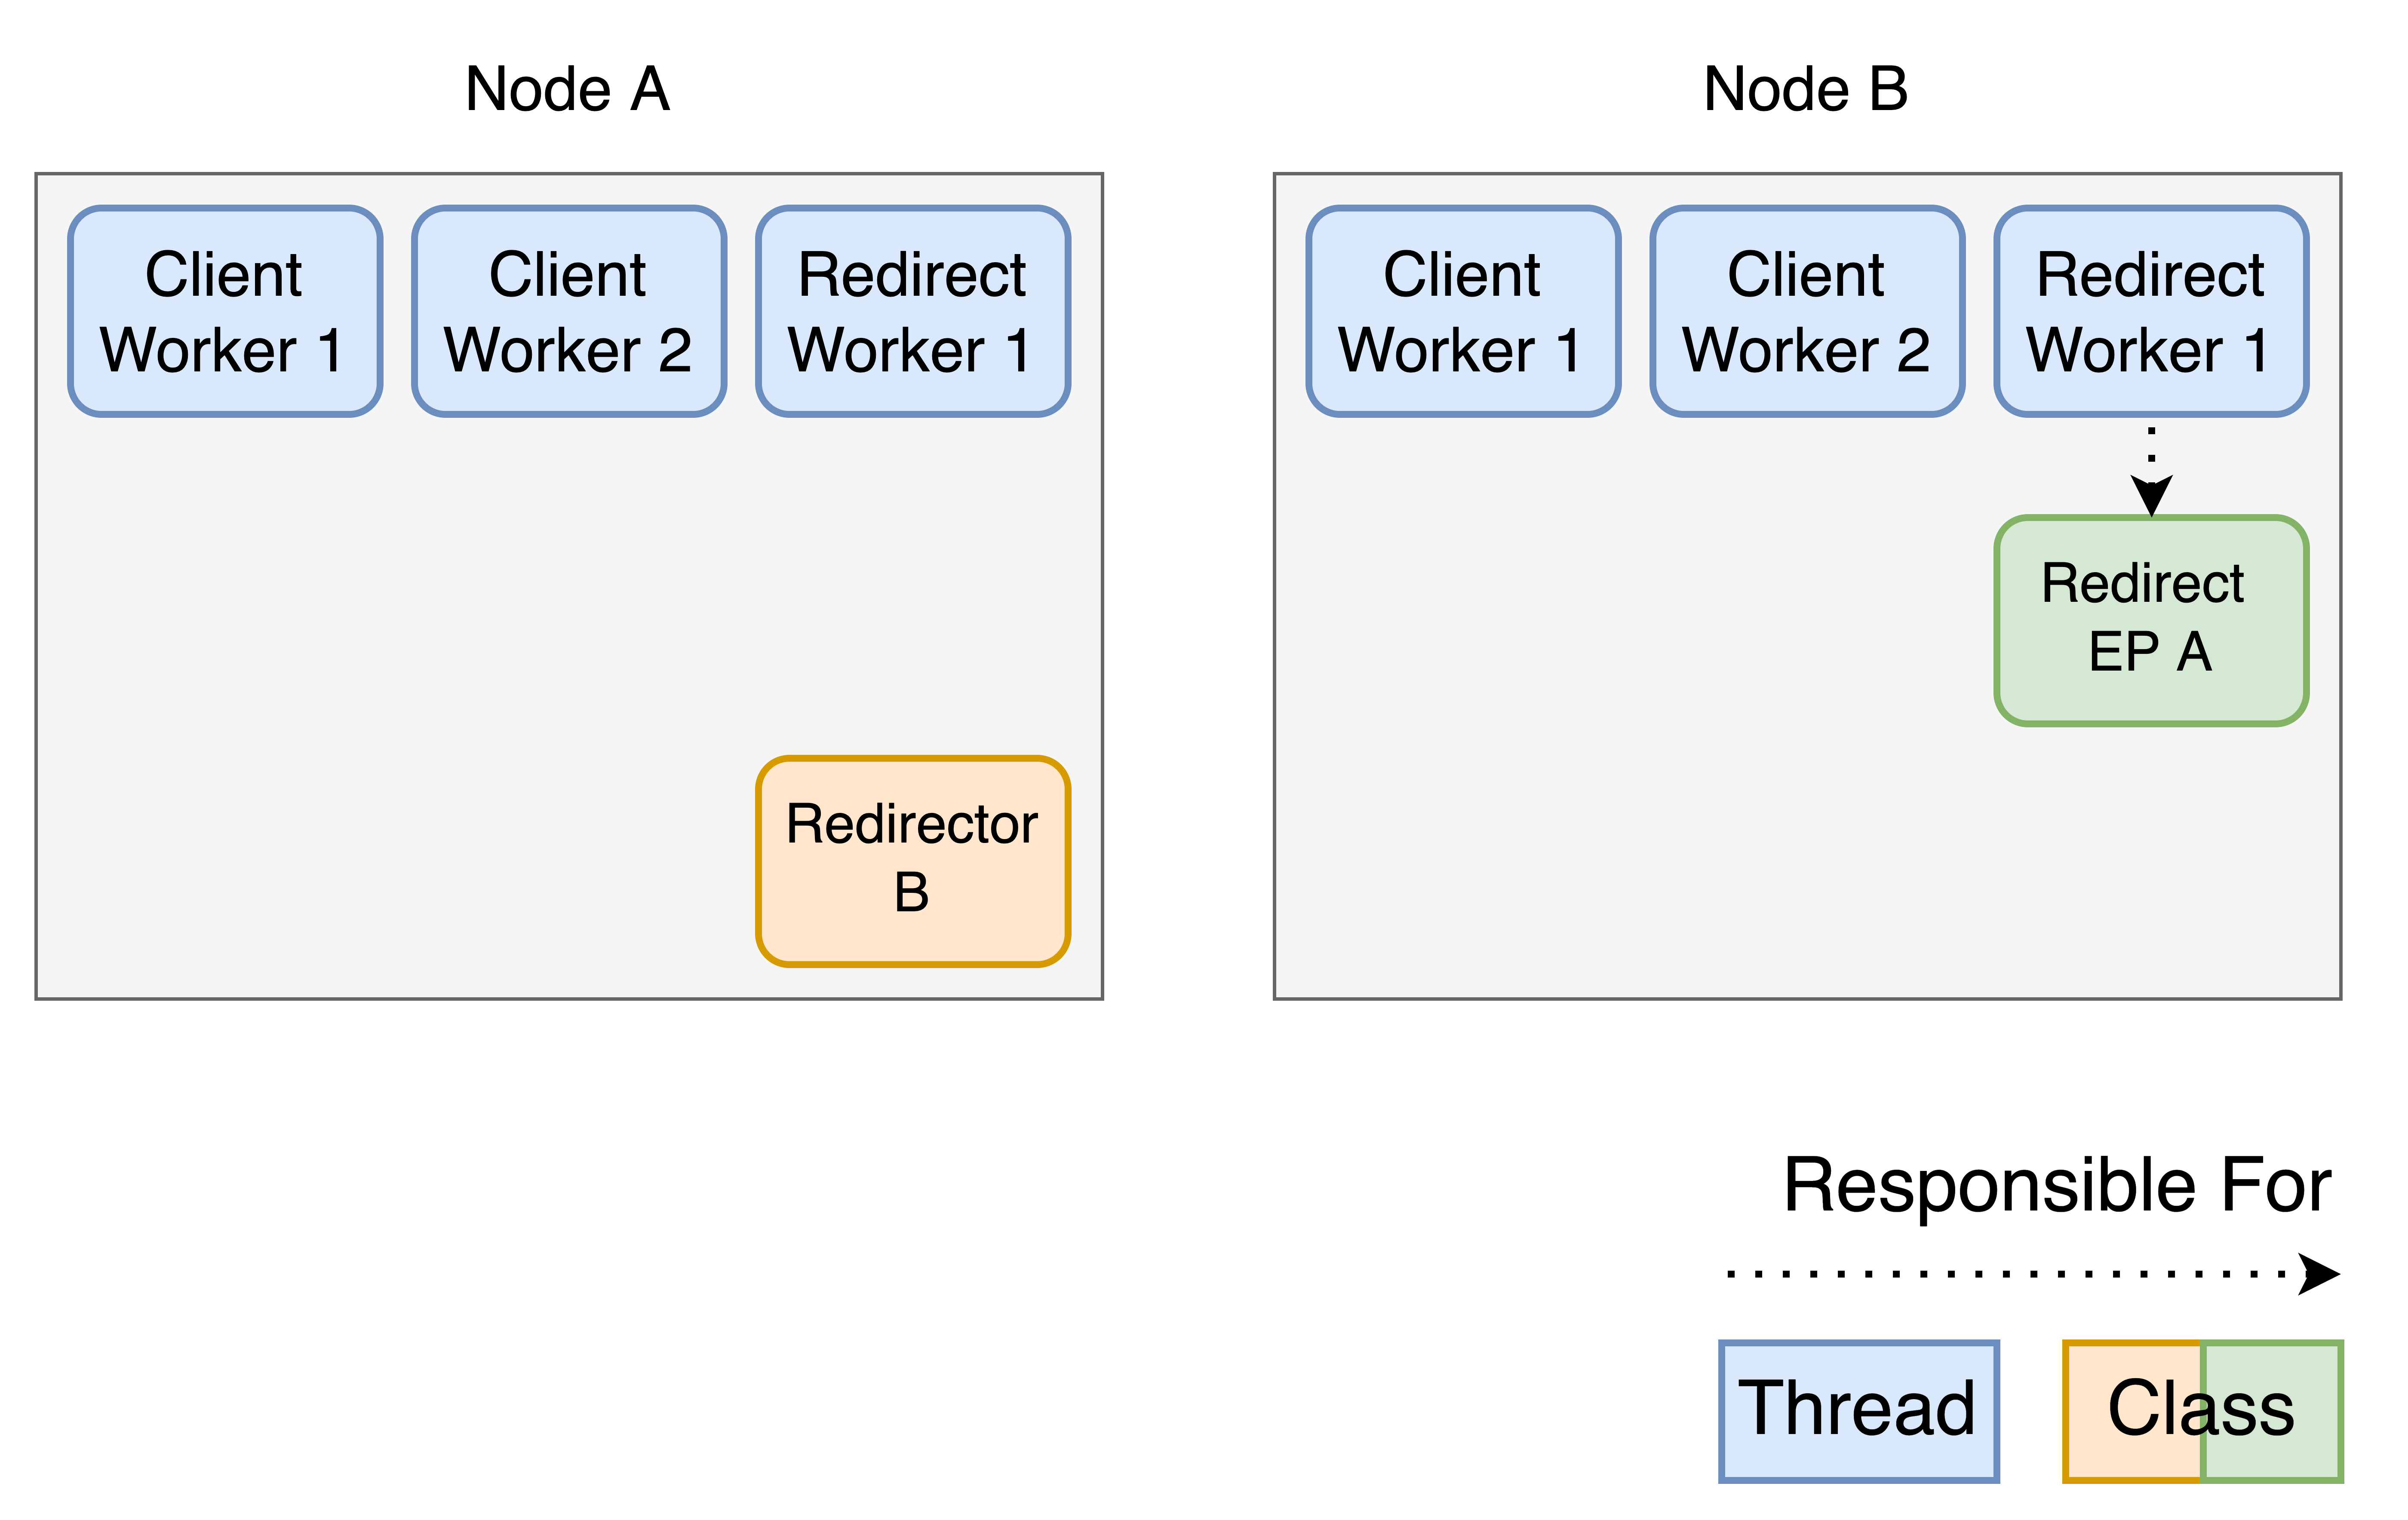
Node A creates a Redirector B. This is a class, which Node A can use for outgoing redirect requests to Node B. To handle that, Node B creates a Redirect EP A. EP stands for endpoint. Note that this is also a class. The thread count in our implementation is static, to guarantee good scaling. A thread is required to operate that Redirect EP, therefore responsibility of the Redirect EP is given to the Redirect Worker 1 of Node B.
Now the same happens the other way around.
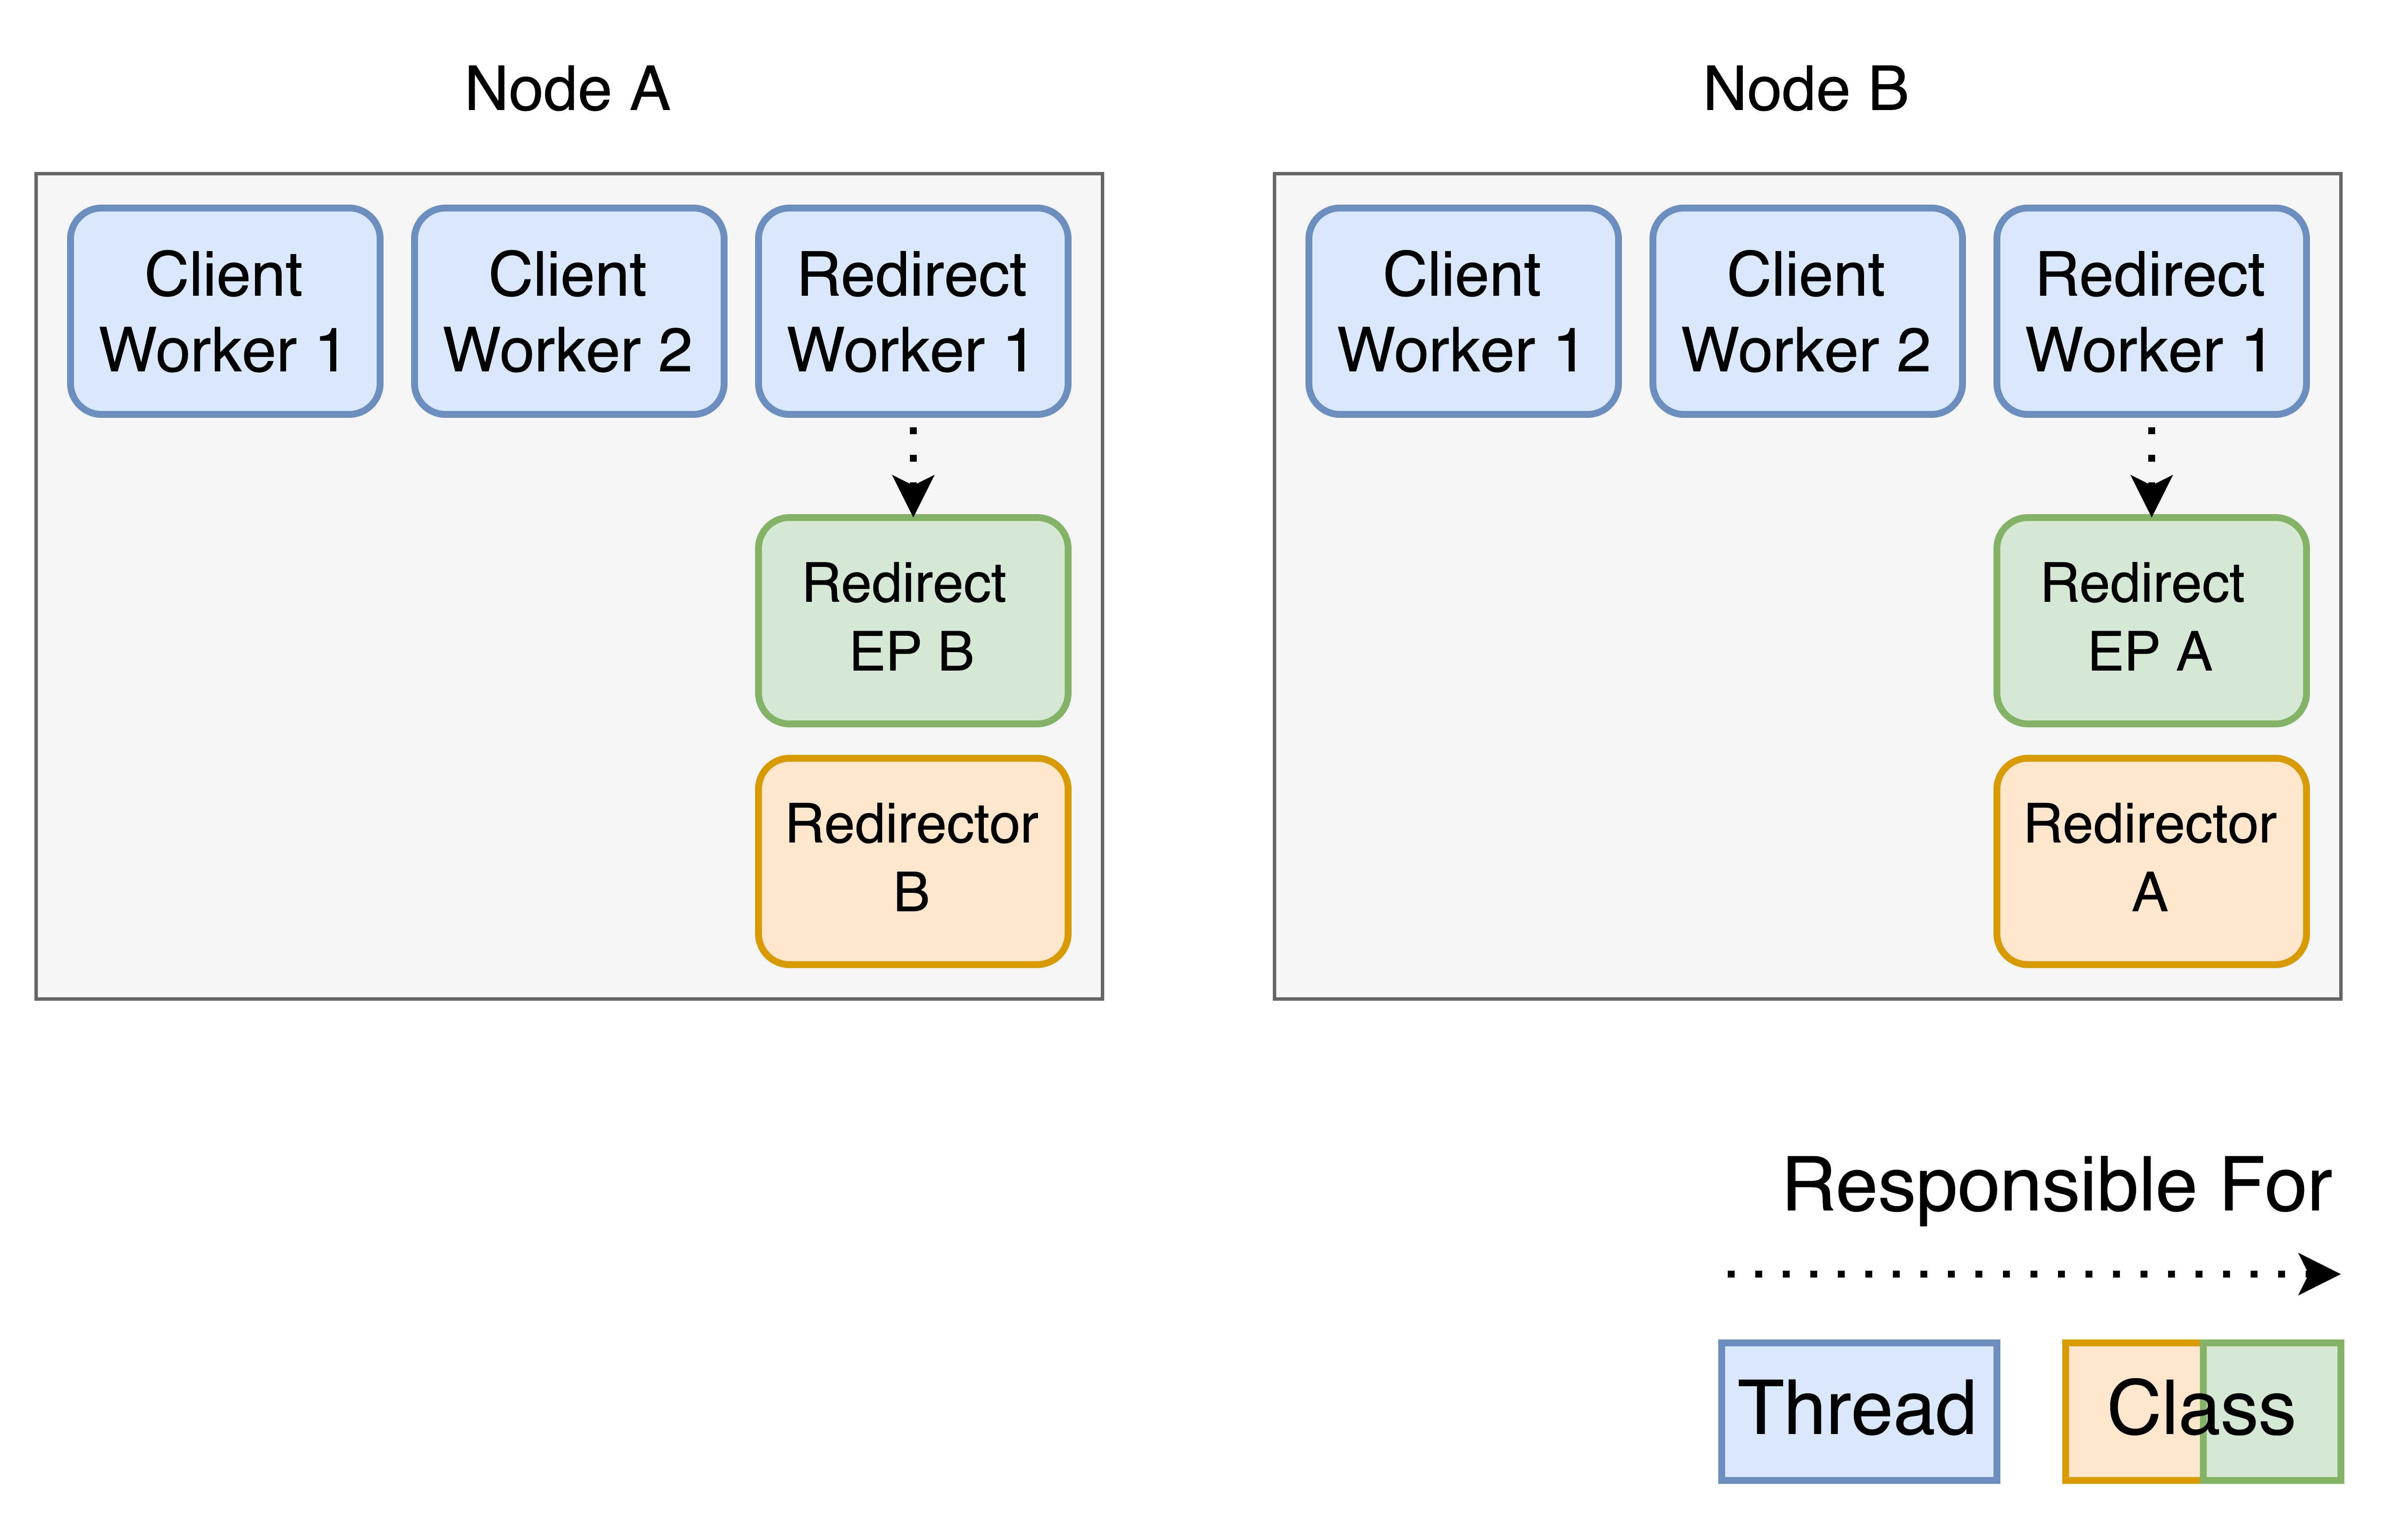
Similar to before Node B creates a Redirector and Node A creates a Redirect EP. Now the cluster is ready to handle clients.
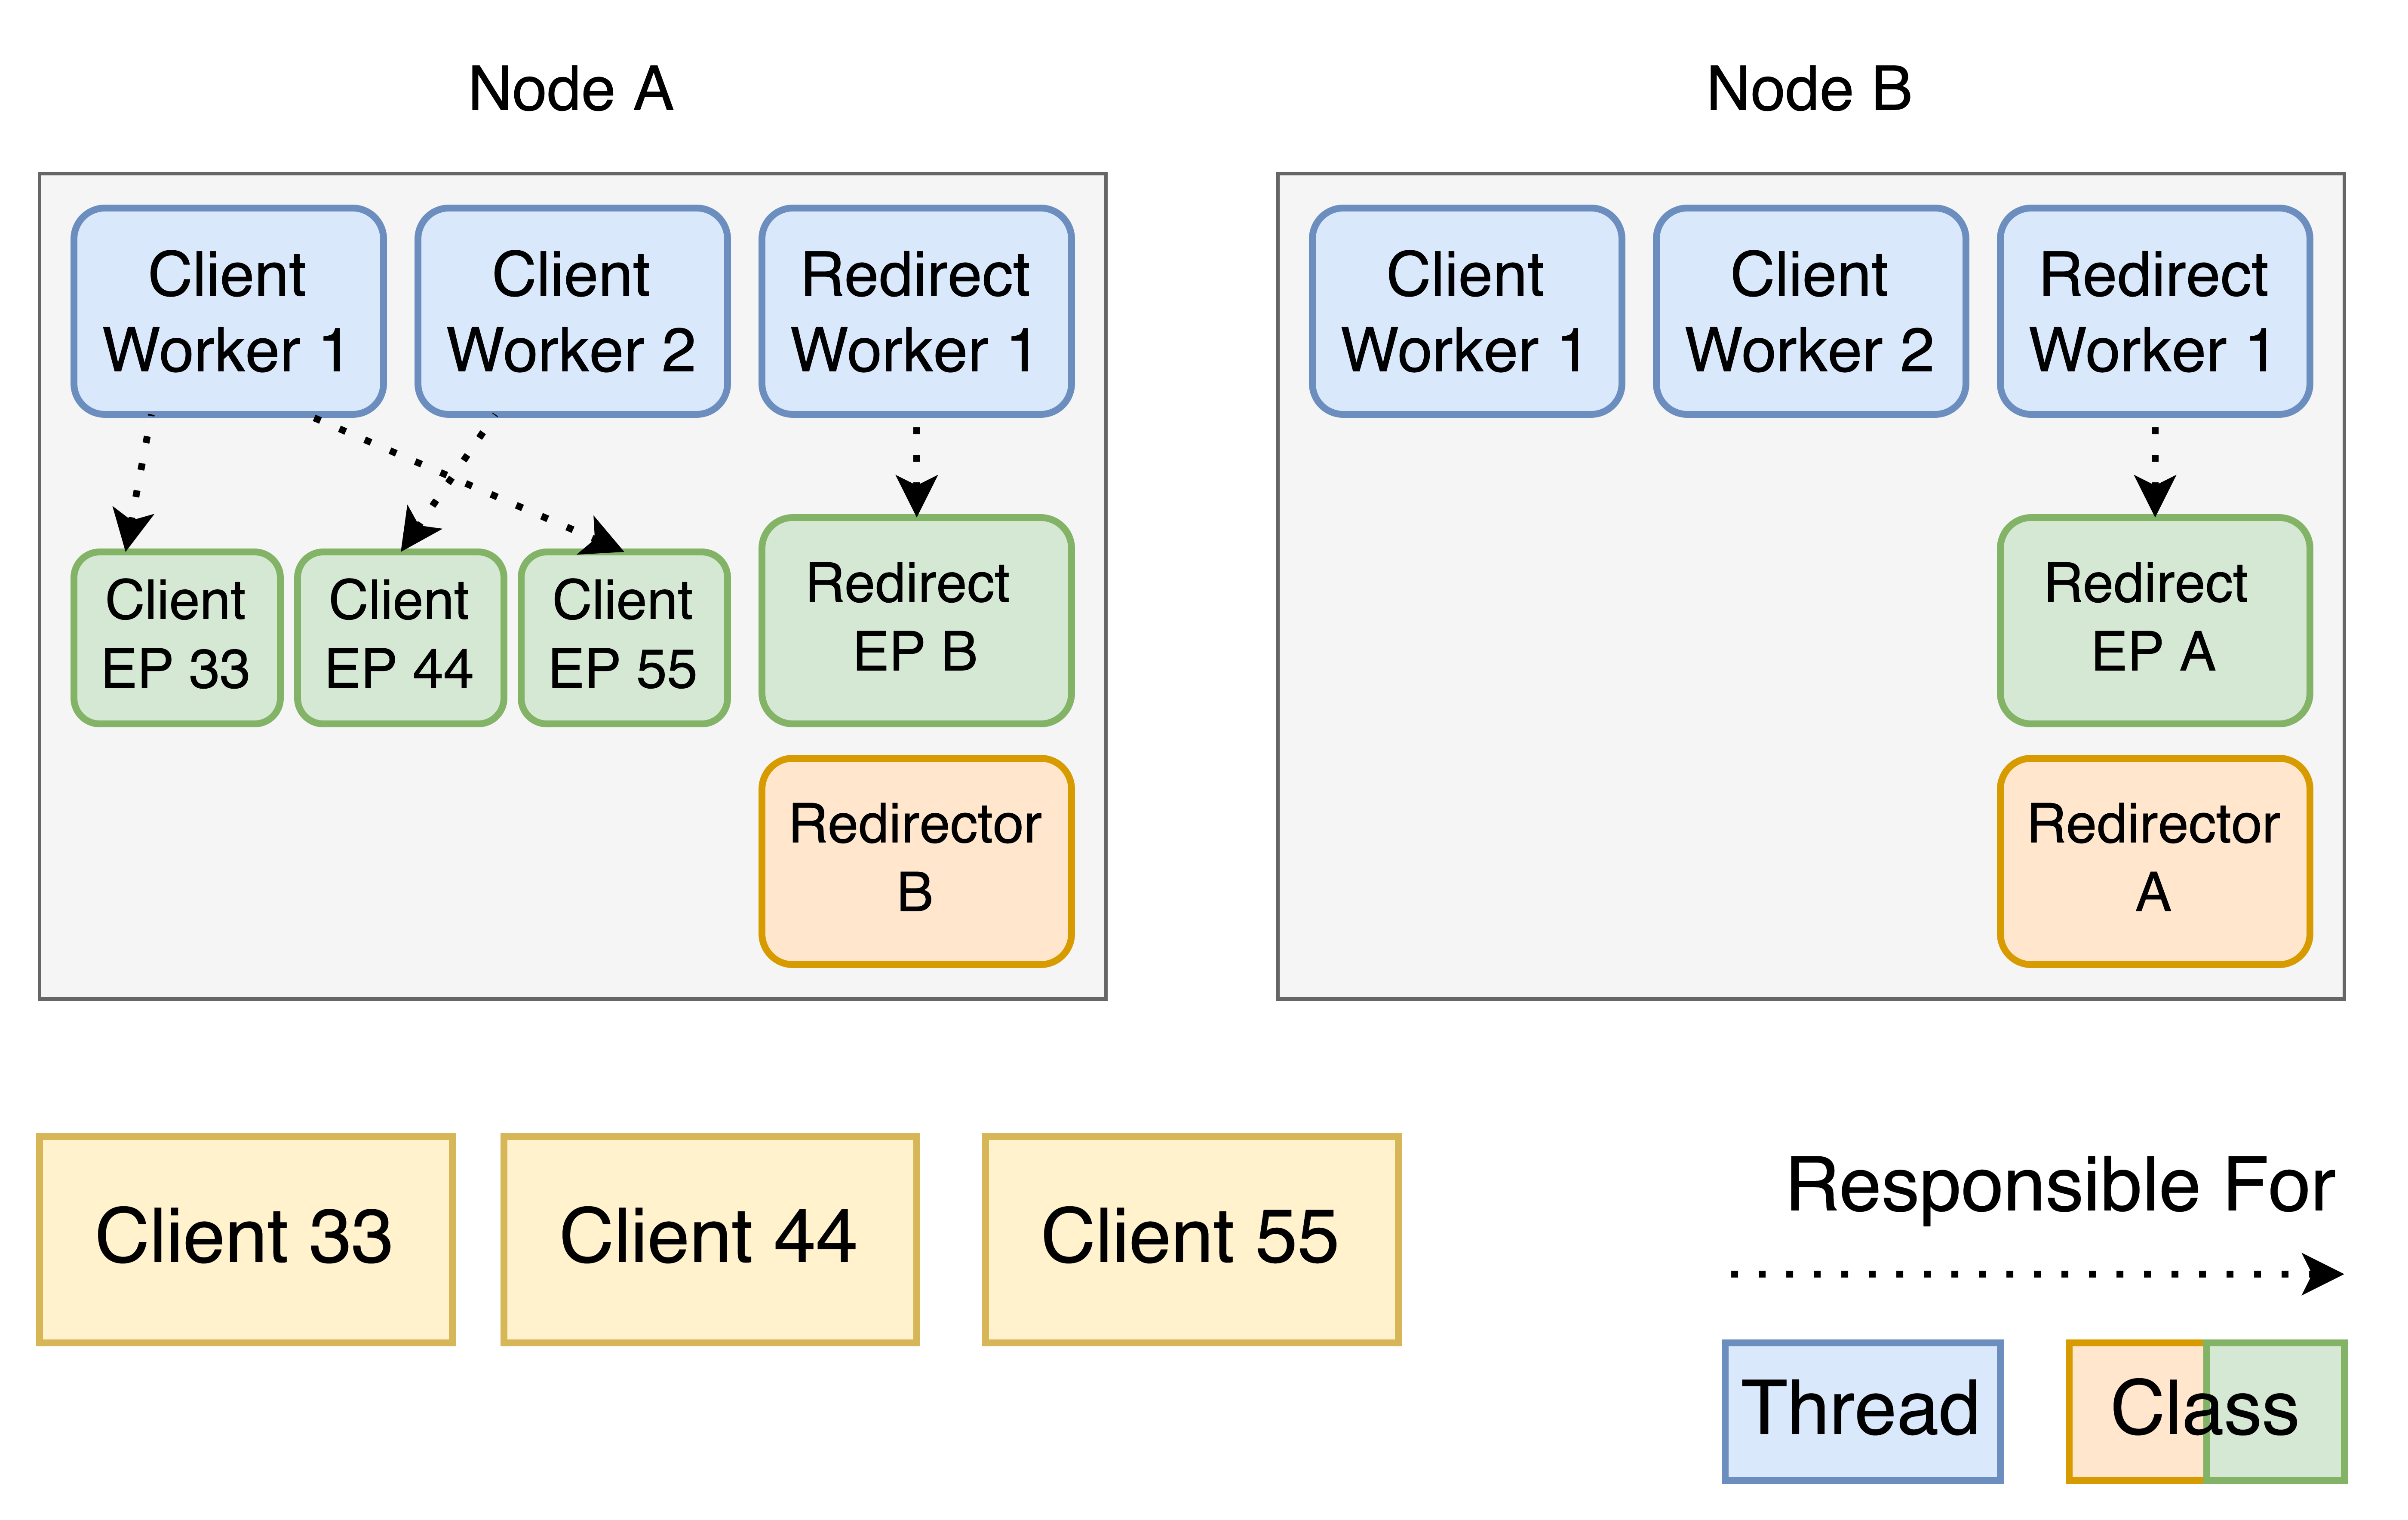
Here three clients connected to Node A in the following order: 33, 44, 55. Node A gives responsibility for the endpoints to the Client Workers in a round-robin fashion.
Connection Handling
For connection handling we use a std::deque with a mutex, that is shared between our ConnectionAcceptor and our ConnectionHandler. Connection requests are handled in a FIFO (First in First out) manner. To realize this, the ConnectionHandler always handles the first element of the deque, while the ConnectionAcceptor inserts new requests at the back of it. The ConnectionHandler is a fragment of earlier versions and could be refactored in an improved version. The current implementation of the ConnectionHandler only distributes the requests to yet another deque. Each of the Workers has an own deque. Whenever the Workers find a connection request in their deque, they will handle it, before continuing with further communication. To understand this better, let’s look at the infinite loop in which the Workers are running.
int status;
while (true) {
    // PART 1: Check for pending connection requests
    while (!drdbConnectionDeque->connection_contexts.empty()) {
        handle_connection_request();
        ep = drdb_endpoints.back().get();

        // Now setup the Client for a new request, this will return immediately
        status = receive_method();
    }

    // PART 2: Check for new requests made by clients
    ...
}
As indicated in the code, during the first part of the loop, the Workers will check if there are any connection requests in the deque. Only once those are all handled, will the Workers move on to part 2, in which they handle communication with the clients.
Communication
Now we will continue with the prior mentioned part 2. Let’s look at the code of it.
int status;
while (true) {
    // PART 1: Check for pending connection requests
    ...

    // PART 2: Check for new requests made by clients
    for (auto &element: drdb_endpoints) {
        if (element->receive_request_context.complete == 1) {
            ep = element.get();

            // A Request has been made by the Client, handle it
            status = receive_method();

            // When an ep disconnects, dont make the second request
            if (status == -1) {
                break;
            }

            // Now setup the Client for a new request
            // This will return immediately
            status = receive_method();
        } else {
            ucp_worker_progress(*ucp_data_worker_p);
        }
    }
}
The Worker loops over all the endpoints he is responsible for and checks if there are new requests. Whenever there is such a request, the Worker will handle an entire communication cycle. Therefore, the current implementation is not asynchronous. Unfortunately, there was no time left, to implement that. The current implementation is already done with async in mind and the architecture should easily support it.
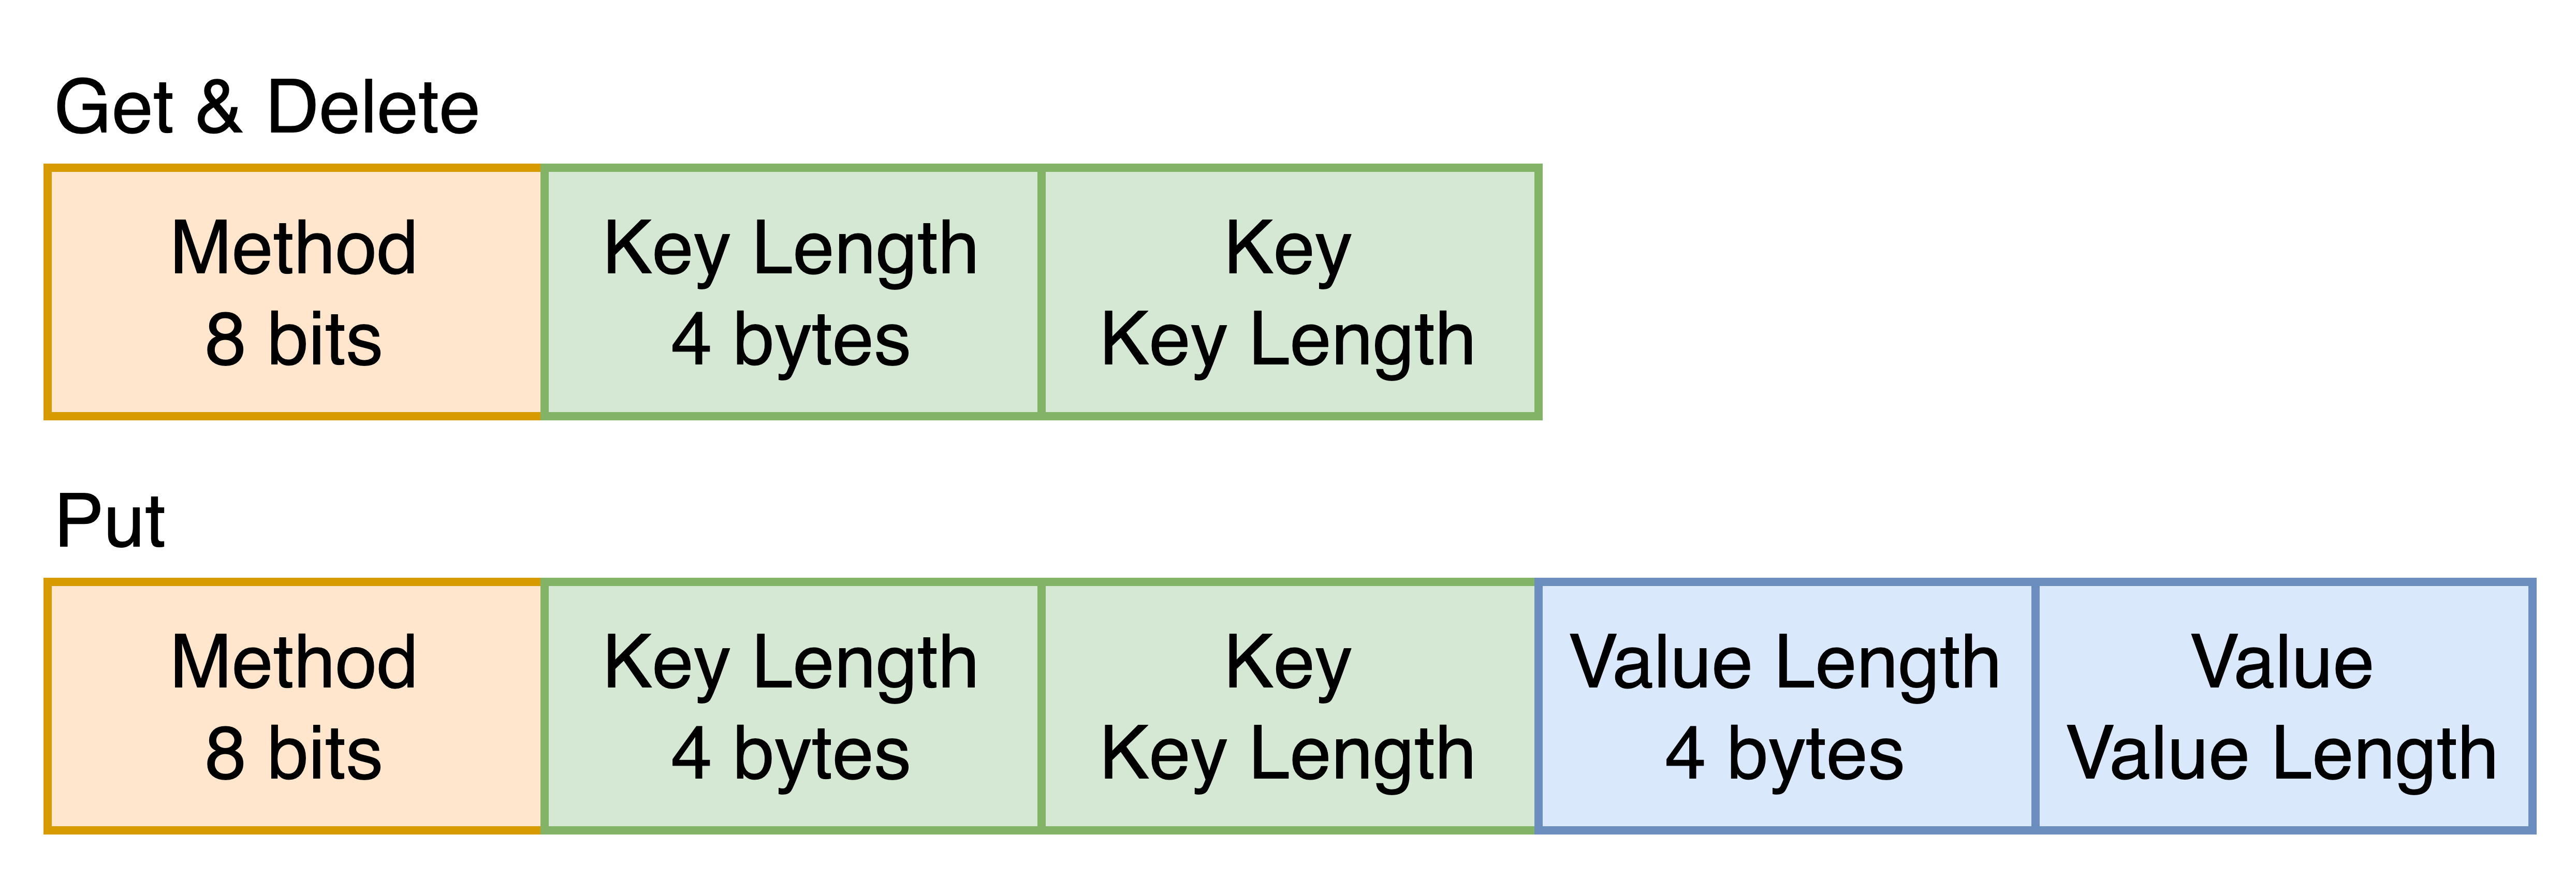
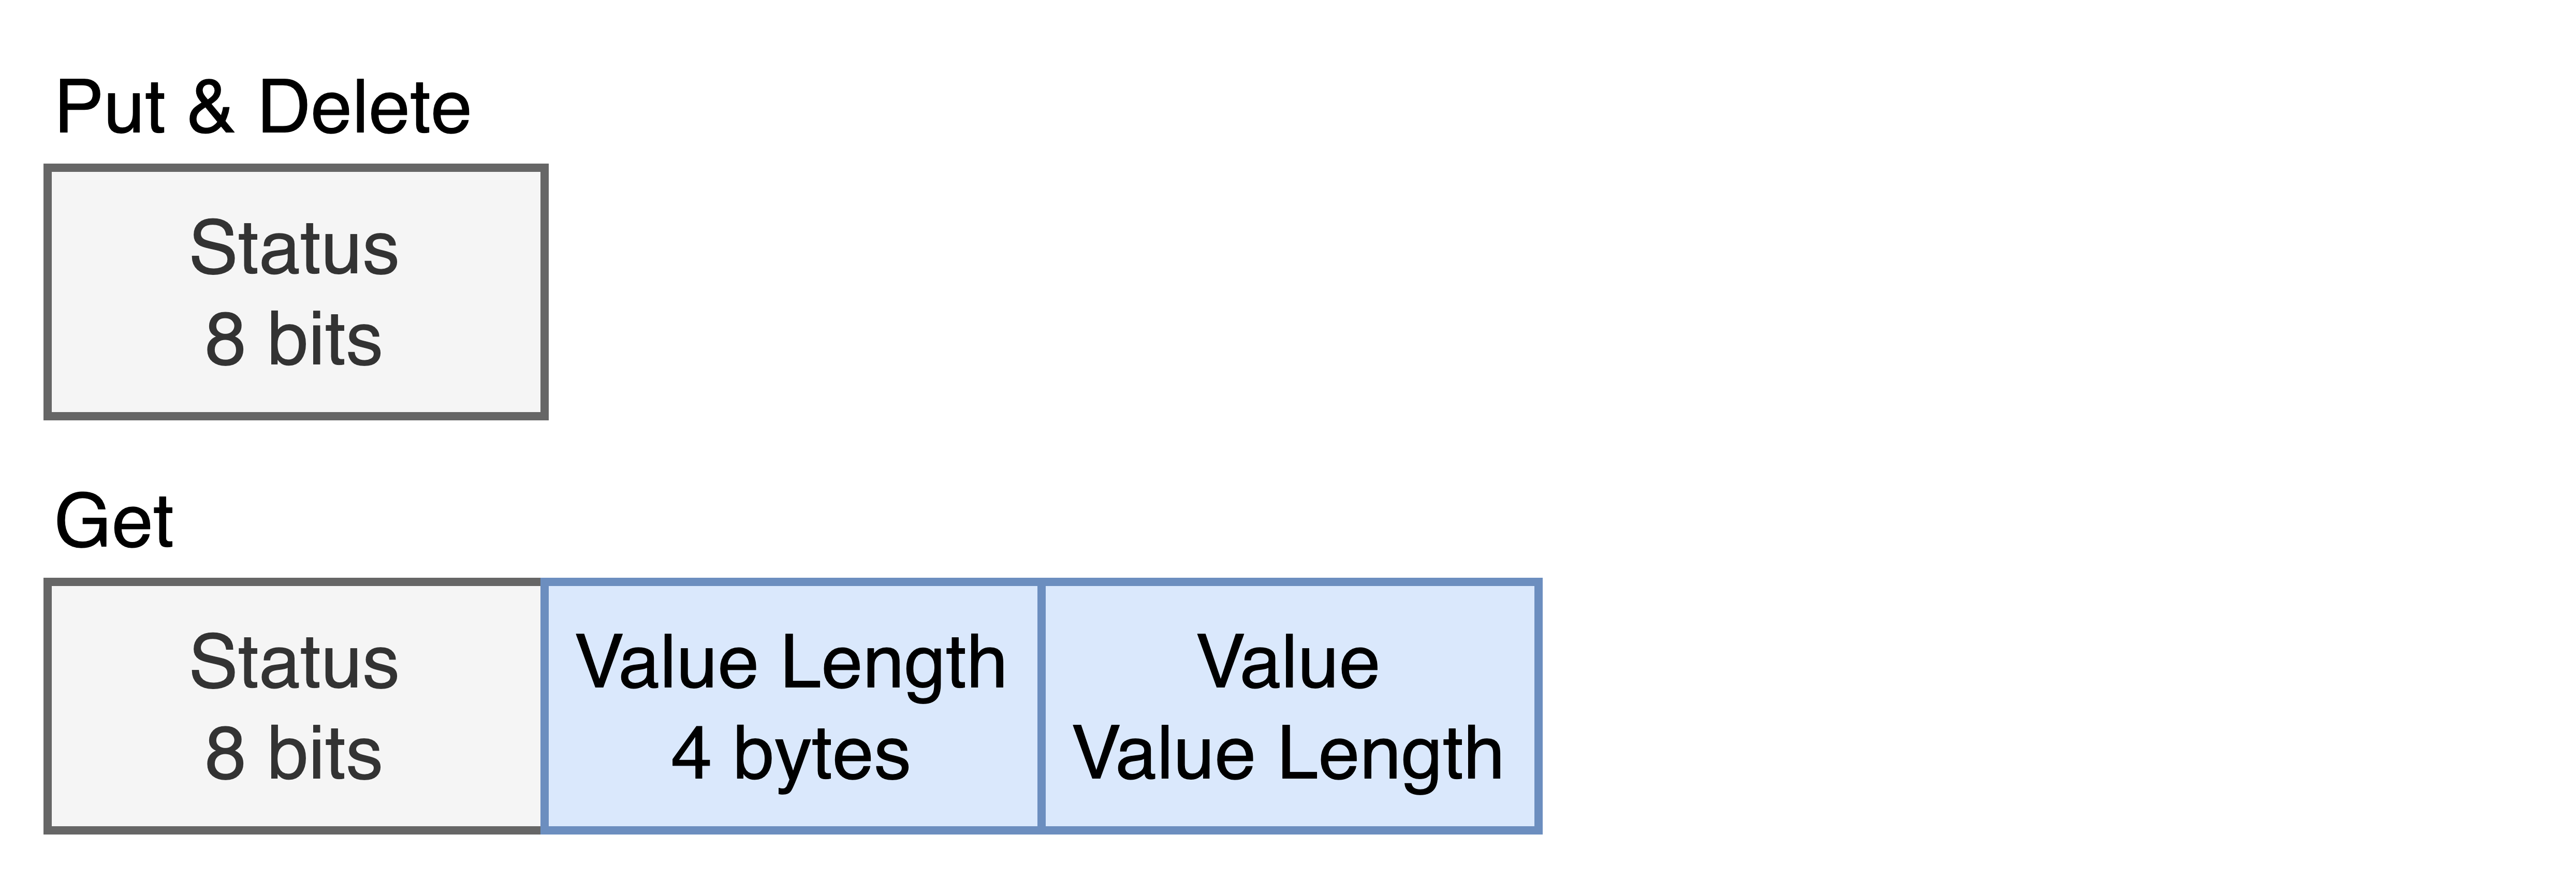
A communication cycle consists of a message by the client and a response by the server. Currently, simple get, put, and delete commands are implemented. The communication protocol is defined as follows.
Yahoo! Cloud Serving Benchmark
To evaluate our server, we wanted to use the Yahoo! Cloud Serving Benchmark, YCSB for short. Our server is still rather minimal and misses three features:
- Range scans
- field lengths > 1, which means, that more than a single field gets transmitted in a message.
- Dividing keys into multiple tables
To assure, that we don’t accidentally run a benchmark that makes use of these functionalities, we define a limiting interface. The interface concatenates table name and key name to emulate table support as follows.
private String generateKey(String table, String key) {
    return String.format("%s.%s", table, key);
}
For our other functions, the interface will return an error.
@Override
public Status scan() {
    return Status.NOT_IMPLEMENTED;
}

@Override
public Status read(Set<String> fields) {
    if(fields != null && fields.size() != 1) {
        System.err.println("Field counts other than 1 are not supported!");
        return Status.BAD_REQUEST;
    }

    ...
}
With this interface, we can implement YCSB as described in its documentation. The result of that can be found in the /yscb folder of this project.
Java Native Interface
Since the YCSB is written in Java, we have to make our Client C++ code available to the JVM with the Java Native Interface, JNI for short.
To achieve that, we define native functions in Java as follows.
public native long initDrdbClient(String serverAddress, int serverPort, String logDir);

public native byte[] get(long nativePtr, String key, int getRequest);

public native byte put(long nativePtr, String key, byte[] value, int putRequest);

public native byte del(long nativePtr, String key, int delRequest);
Native functions are not going to be implemented in Java. Instead, we will compile this code with the -h flag and get a header file from it. If you want to try this yourself with this project, you can use the Gradle task compileJava instead. Once we have received this header file, we have to implement it with native code.
Before we look at the native code, let’s talk about an encoding problem. Java Strings are UTF-16, while C++ Strings are UTF-8. So we have to convert our keys as follows.
@Override
public byte[] get(String key) {
    getRequest++;

    byte[] keyBytes = key.getBytes(StandardCharsets.UTF_8);
    String utf8EncodedKey = new String(keyBytes, StandardCharsets.UTF_8);
    byte[] result = get(nativePtr, utf8EncodedKey, getRequest);

    if (result.length == 0) {
        return null;
    }

    return result;
}
Now, let’s look at the native code for a get.
jbyteArray Java_site_ycsb_db_JDrdbClient_get(JNIEnv *env, jobject, jlong drdb_p, jstring jKey, jint request) {
    int request_number = (int) request;
    auto *drdbClient_p = (DrdbClient *) drdb_p;

    std::string key = convert_jstring(env, jKey);

    auto result = drdbClient_p->get(key);

    if (result.value.empty()) {
        return env->NewByteArray(0);
    }

    jbyteArray reply = env->NewByteArray(result.value.length());
    env->SetByteArrayRegion(reply, 0, result.value.length(),
                            reinterpret_cast<const jbyte *>(result.value.c_str())
    );

    return reply;
}
First, we can see, that we use the address drdb_p to access our Client object. This pointer is given as an argument from the Java side. Logically, our JNI code works as follows: First, we initialize a Distributed RocksDB Client object with initDrdbClient(). This function then returns the pointer to our Client object. We then transmit this address to our get, put, or delete function every time we use it.
Next, we have to convert our String once again, despite already changing the encoding on the Java side. This is simply due to JNI design. We can’t just use Strings or ByteArrays directly. Let’s first finish looking at this function, then we will look at the conversion functions. So after converting the key, we can simply call our get function and receive a result. We will then have to convert our result to a jbyteArray, which we then can return to the JVM. Now let’s look at the conversion functions:
std::string convert_jstring(JNIEnv *env, jstring jKey) {
    jboolean isCopy;
    auto converted_string = env->GetStringUTFChars(jKey, &isCopy);
    auto key = std::string{converted_string};
    env->ReleaseStringUTFChars(jKey, converted_string);
    return key;
}

std::string convert_jByteArray(JNIEnv *env, jbyteArray jValue) {
    jsize num_bytes = env->GetArrayLength(jValue);
    jboolean isCopy;
    jbyte *elements = env->GetByteArrayElements(jValue, &isCopy);
    std::string value{reinterpret_cast<char *>(elements), static_cast<size_t>(num_bytes)};
    env->ReleaseByteArrayElements(jValue, elements, JNI_ABORT);
    return value;
}
We have to create a new object from the given bytes, we can not operate on the given object directly. Then we create a C++ std::string from that. Afterwards, we have to release the intermediate object, else wise we are going to leak memory.
Once the native code has been implemented, we have to compile it and create a library of it. In this project, this is done with CMake inside /cpp/src/distributed-rocksdb/JNI/CMakeLists.txt. This library then has to be loaded inside our Java program as follows.
public class JDrdbClient extends KeyValueStore {
    static {
        System.loadLibrary("jdrdb-client");
    }

    ...
}
For the scope of this article, this should be enough background knowledge on this project. If you are curious about more details, you can check out the repository.
Next, we will talk a bit about containerization, then we will look at the benchmarks we ran.
Containerization
Docker
I like Docker. The reproducibility is a big advantage for me. Therefore, I developed this project with Docker as my development environment. The newest versions of CLion allow using Docker as a dev environment and pretty much everything works flawlessly. This only applies to my M1 MacBook Air. On my Windows machine, the performance was awful. I tried plenty of solutions I found online, but none of them fixed the performance. When I make changes on my MacBook, there is close to zero latency compared to native development. On my Windows machine, there is multiple seconds latency. This occurs both “natively” and with WSL2. I have not tested it on Linux, but if I had to make a guess, I am certain the performance will be even better than on macOS.
Enough talk about operating systems though, let’s look at the Docker config. We use /dockerfiles/debian_base.dockerfile as our dev environment. This dockerfile creates a dev environment based on Debian 11. It installs all required dependencies and sets required path variables. With that, if you want to test this project, all you have to do is clone the repository, build the docker image and select it as your dev environment in CLion. Pretty convenient as far as I am concerned. This helps if you find a bug and want someone else to help you out. I am certain VSCode also supports Docker as dev environments very well. I am not sure about other editors though.
With our build scripts mentioned at the beginning, we can start and test our implementation in CLion. Additionally, we also have docker-compose scripts for testing our implementation. docker-compose.4servers-4clients.yml for example starts a 4 node cluster and benchmarks it with 4 clients. The file looks as follows.
services:
  server1:
    build:
      context: .
      dockerfile: dockerfiles/drdb_debug.dockerfile
    image: "hutii/drdb:latest"
    entrypoint: "/app/build/src/distributed-rocksdb/Server/distributed-rocksdb-server-cpp -s server1 -p 13337 -c /app/src/distributed-rocksdb/Server/server_config4.txt"
    network_mode: host

  ...

  client1:
    build:
      context: .
      dockerfile: dockerfiles/drdb_debug.dockerfile
    image: "hutii/drdb:latest"
    entrypoint: "/app/build/src/distributed-rocksdb/Client/distributed-rocksdb-client-cpp -s server1 -p 13337"
    depends_on:
      - server1
      - server2
      - server3
      - server4
    network_mode: host

  ...
We omit servers 2, 3, and 4, and clients 2, 3, and 4 for clarity. All services make use of drdb_debug.dockerfile. This file is rather long, so let’s look at this shortened version of it to understand the logic behind it.
###################
# BUILDER PHASE
###################

FROM hutii/drdb:base AS builder

# Build everything
...

###################
# RELEASE IMAGE
###################
FROM debian:11

# Install only required libraries for running

...

# Copy binaries from builder phase

...
This dockerfile makes use of multi-stage Docker builds. At the start, we have our builder phase. Here we use our previously mentioned base image, which has all kinds of build tools like GCC and CMake installed. With that, we compile our project and build everything. We can create a docker image based on this step with the following command.
docker build -f ./dockerfiles/drdb_debug.dockerfile --target builder -t hutii/drdb:debug .
In the next phase, we start with a new base. This time we don’t use our base image, but a clean version of Debian 11 instead. We don’t install build tools like GCC and CMake this time. Instead, we only install required libraries for running. We then copy all the binaries created in the builder phase to this image. If want to build this slimmer image, we just need to omit the --target builder from our previous command.
docker build -f ./dockerfiles/drdb_debug.dockerfile -t hutii/drdb:latest .
On my ARM-based machine, this results in the following image size difference.
REPOSITORY      TAG         IMAGE ID        CREATED                 SIZE
hutii/drdb      latest      f167bfb0ddf9    About a minute ago      734MB
hutii/drdb      debug       3f84bc912b89    About a minute ago      1.96GB
We save more than a GB. For deployment of a real project, this is relevant, as it saves storage on costly cloud services. For this project, it saves us some time, when uploading our image to DockerHub.
As a part of our containerization, we set up GitHub Actions, which automatically build and deploy our project to DockerHub, whenever we make a commit in a releases branch. The .github/workflows/docker-image.yml looks as follows.
name: Docker Image CI

on:
  push:
    branches:
      - "releases/001"

jobs:
  build:
    runs-on: ubuntu-latest

    steps:
      - name: Login to DockerHub
        uses: docker/login-action@v1
        with:
          username: ${{ secrets.DOCKERHUB_USERNAME }}
          password: ${{ secrets.DOCKERHUB_TOKEN }}
      - uses: actions/checkout@v2
      - name: Build the Docker image
        run: docker build -f ./dockerfiles/debian_base.dockerfile -t hutii/drdb:base . && docker build -f ./dockerfiles/drdb_debug.dockerfile -t hutii/drdb:latest . && docker push hutii/drdb:latest
We use our DockerHub-hosted image in the next step.
Singularity
We want to test our project on our University’s cluster. We use OpenPBS there and the users do not have root rights. Using Docker is therefore not possible. Podman is an option, but instead, we use Sylabs Singularity Containers, which are commonly used in High-Performance-Computing. Singularity makes it very easy to convert a Docker Image to a Singularity Image. The script looks as follows.
Bootstrap: docker
From: hutii/drdb:latest

%labels
    Version v0.0.1

%help
    Wrapper for docker image of distributed rocksdb
We just need to pull the image from DockerHub and that’s it. We can even use the Sylabs Remote Builder for this step. The Sylabs Remote Builder is a free service for building Singularity Images. With this Remote Builder and our GitHub Action, we completely removed the necessity for building anything locally. This is fairly convenient in two ways. First, I am developing on an ARM-based machine, but we need to deploy the project to x86-based machines. x86 Docker images are slow to build on my ARM-based machine and even worse, singularity does not work on ARM. The second point is, that I had to travel frequently during the time I had to write my Master’s Thesis, and internet while traveling is rather bad in Germany (strongly depending on the location).
Evaluation
Clusters
We ran experiments in two different settings.
The first one is the Operating Systems Research Group Cluster at my university. There we have a variety of nodes with Infiniband hardware. We always used nodes with 56GBit/s Infiniband. All nodes run Intel Xeon E5-1650 CPUs. We use OpenPBS there and we requested nodes with 62GB of RAM for our servers and nodes with 15GB of RAM for our clients. We requested 8 vCPUs for both clients and servers. Both clients and servers had access to Flash Storage. All nodes run CentOS Stream 8.
The second setting is a cluster running on Amazon Web Services. We used r5.2xlarge instances for our servers. These have 8 vCPUs and 64GB of RAM. For our clients, we used c4.2xlarge instances, which have 15GB of RAM and also 8 vCPUs. We gave servers 200GB of gp2 Flash Storage and 30GB of gp2 Flash Storage to the clients. All nodes run Ubuntu 22.04.
Workloads
All experiments are performed with the YCSB Workload A. Workload A consists of 50% reads and 50% updates. The distribution is Zipfian. Unless specified differently Workload A is run with a package size of 1KB. A real-world example for Workload A is a Session store recording recent actions.
Software Versions
The project was tested in a Singularity container running Debian 11, RocksDB 6.11.4-3, and UCX 1.12.0. For the HHU cluster singularity version 3.8.5-2.el8 was used. For the AWS cluster singularity version 3.9.9 was used.
Operating Systems Research Group Cluster
Optimal Configuration
We have a static amount of Client Workers and Redirect Workers. Finding an optimal amount for both of those is interesting. Fully analyzing this was beyond the scope of my thesis, but with the following experiment, we get a first feeling for it. We compare two configurations: One with 4 Client Workers and 4 Redirect Workers. One with 6 Client Workers and 1 Redirect Worker. Both configurations create 2 connections to each other server.
To get a feeling for the data, violin plots are examined.
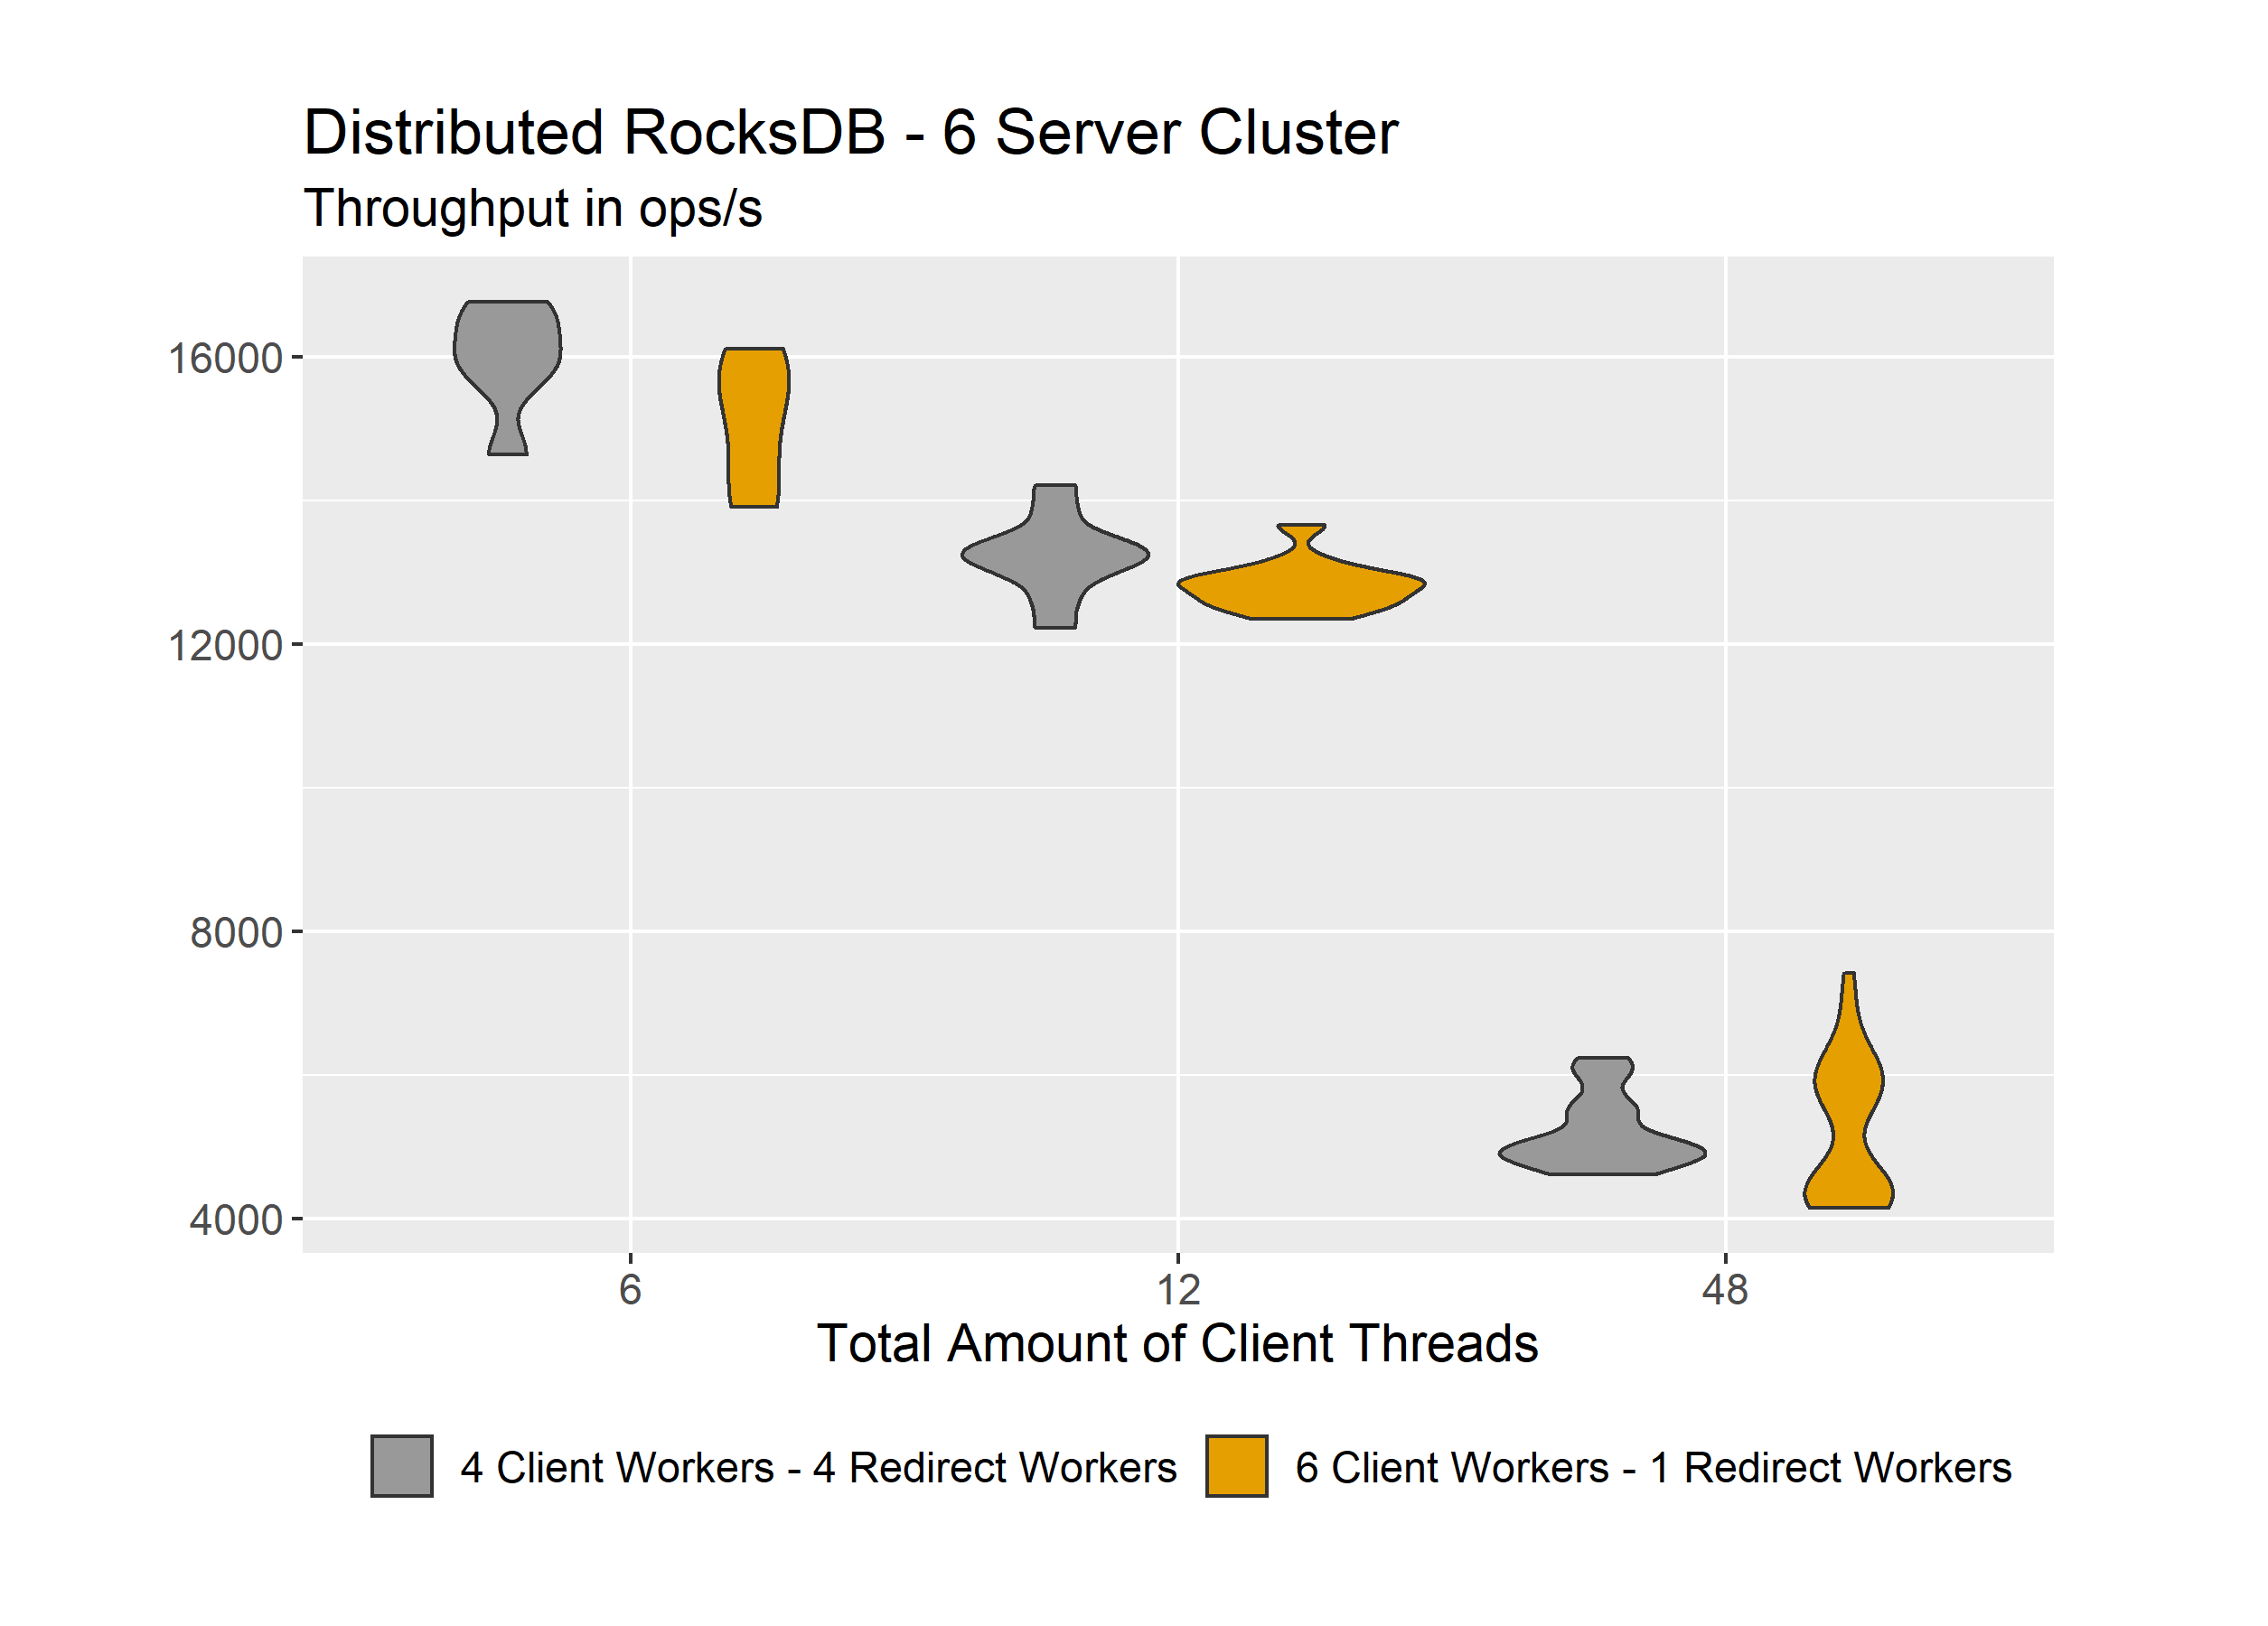
On the y-axis is the throughput in ops/s and on the x-axis we are increasing the number of client threads, that are sending requests to the cluster. With an increase in clients, we expect the throughput per client to reduce. We can see no anomalies in the distribution of our measurements here, which is good. Next, we can look at the summed throughput of our cluster.
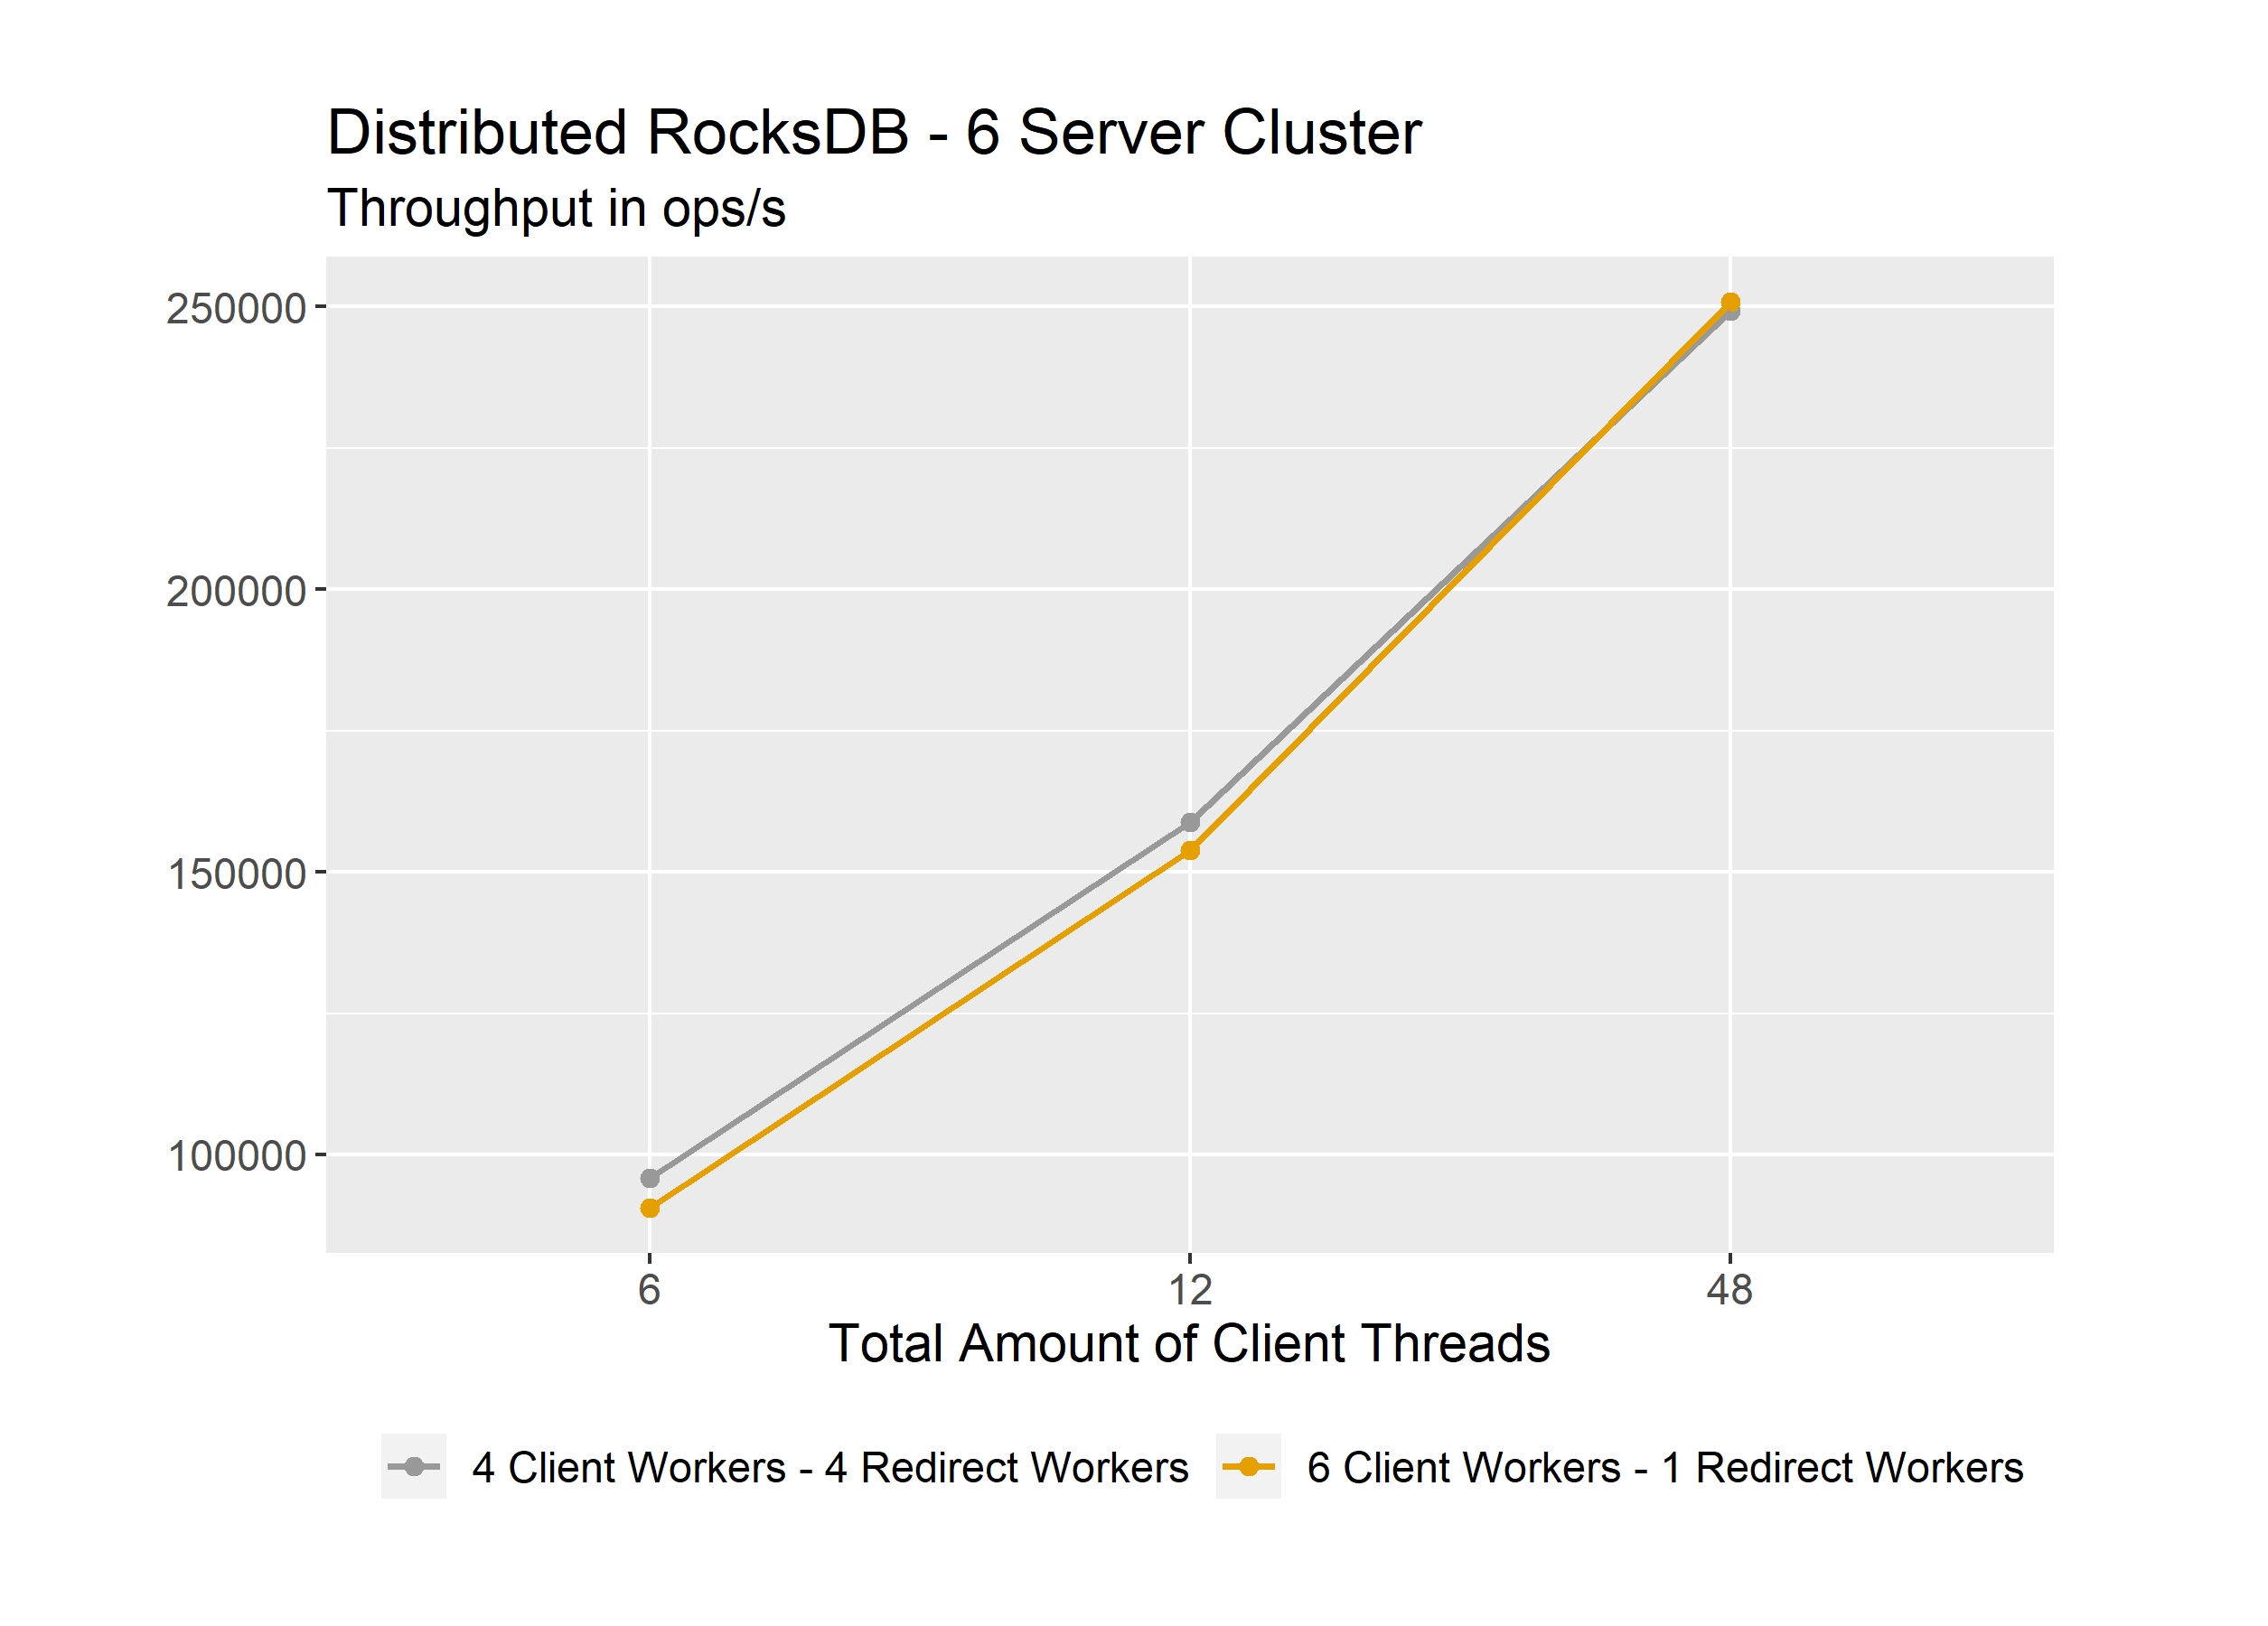
Since we have a 6-node cluster with each node having 8 vCPUs, we have 48 vCPUs in total. Therefore, we expect the total throughput to increase up to 48 clients at least. This is as expected. If we now compare the configurations, we see that the 4 Client Workers and 4 Redirect Workers configuration is slightly better on 6 and 12 clients. The 6 Client Worker and 1 Redirect Worker configuration is slightly better on 48 clients. In general, many more experiments are required to make hard statements about an optimal configuration.
Infiniband vs Ethernet
We specifically used UCX as our networking framework to support Infiniband hardware. Therefore a comparison between Ethernet and Infiniband hardware is very important. Let’s look at the achieved throughput here.
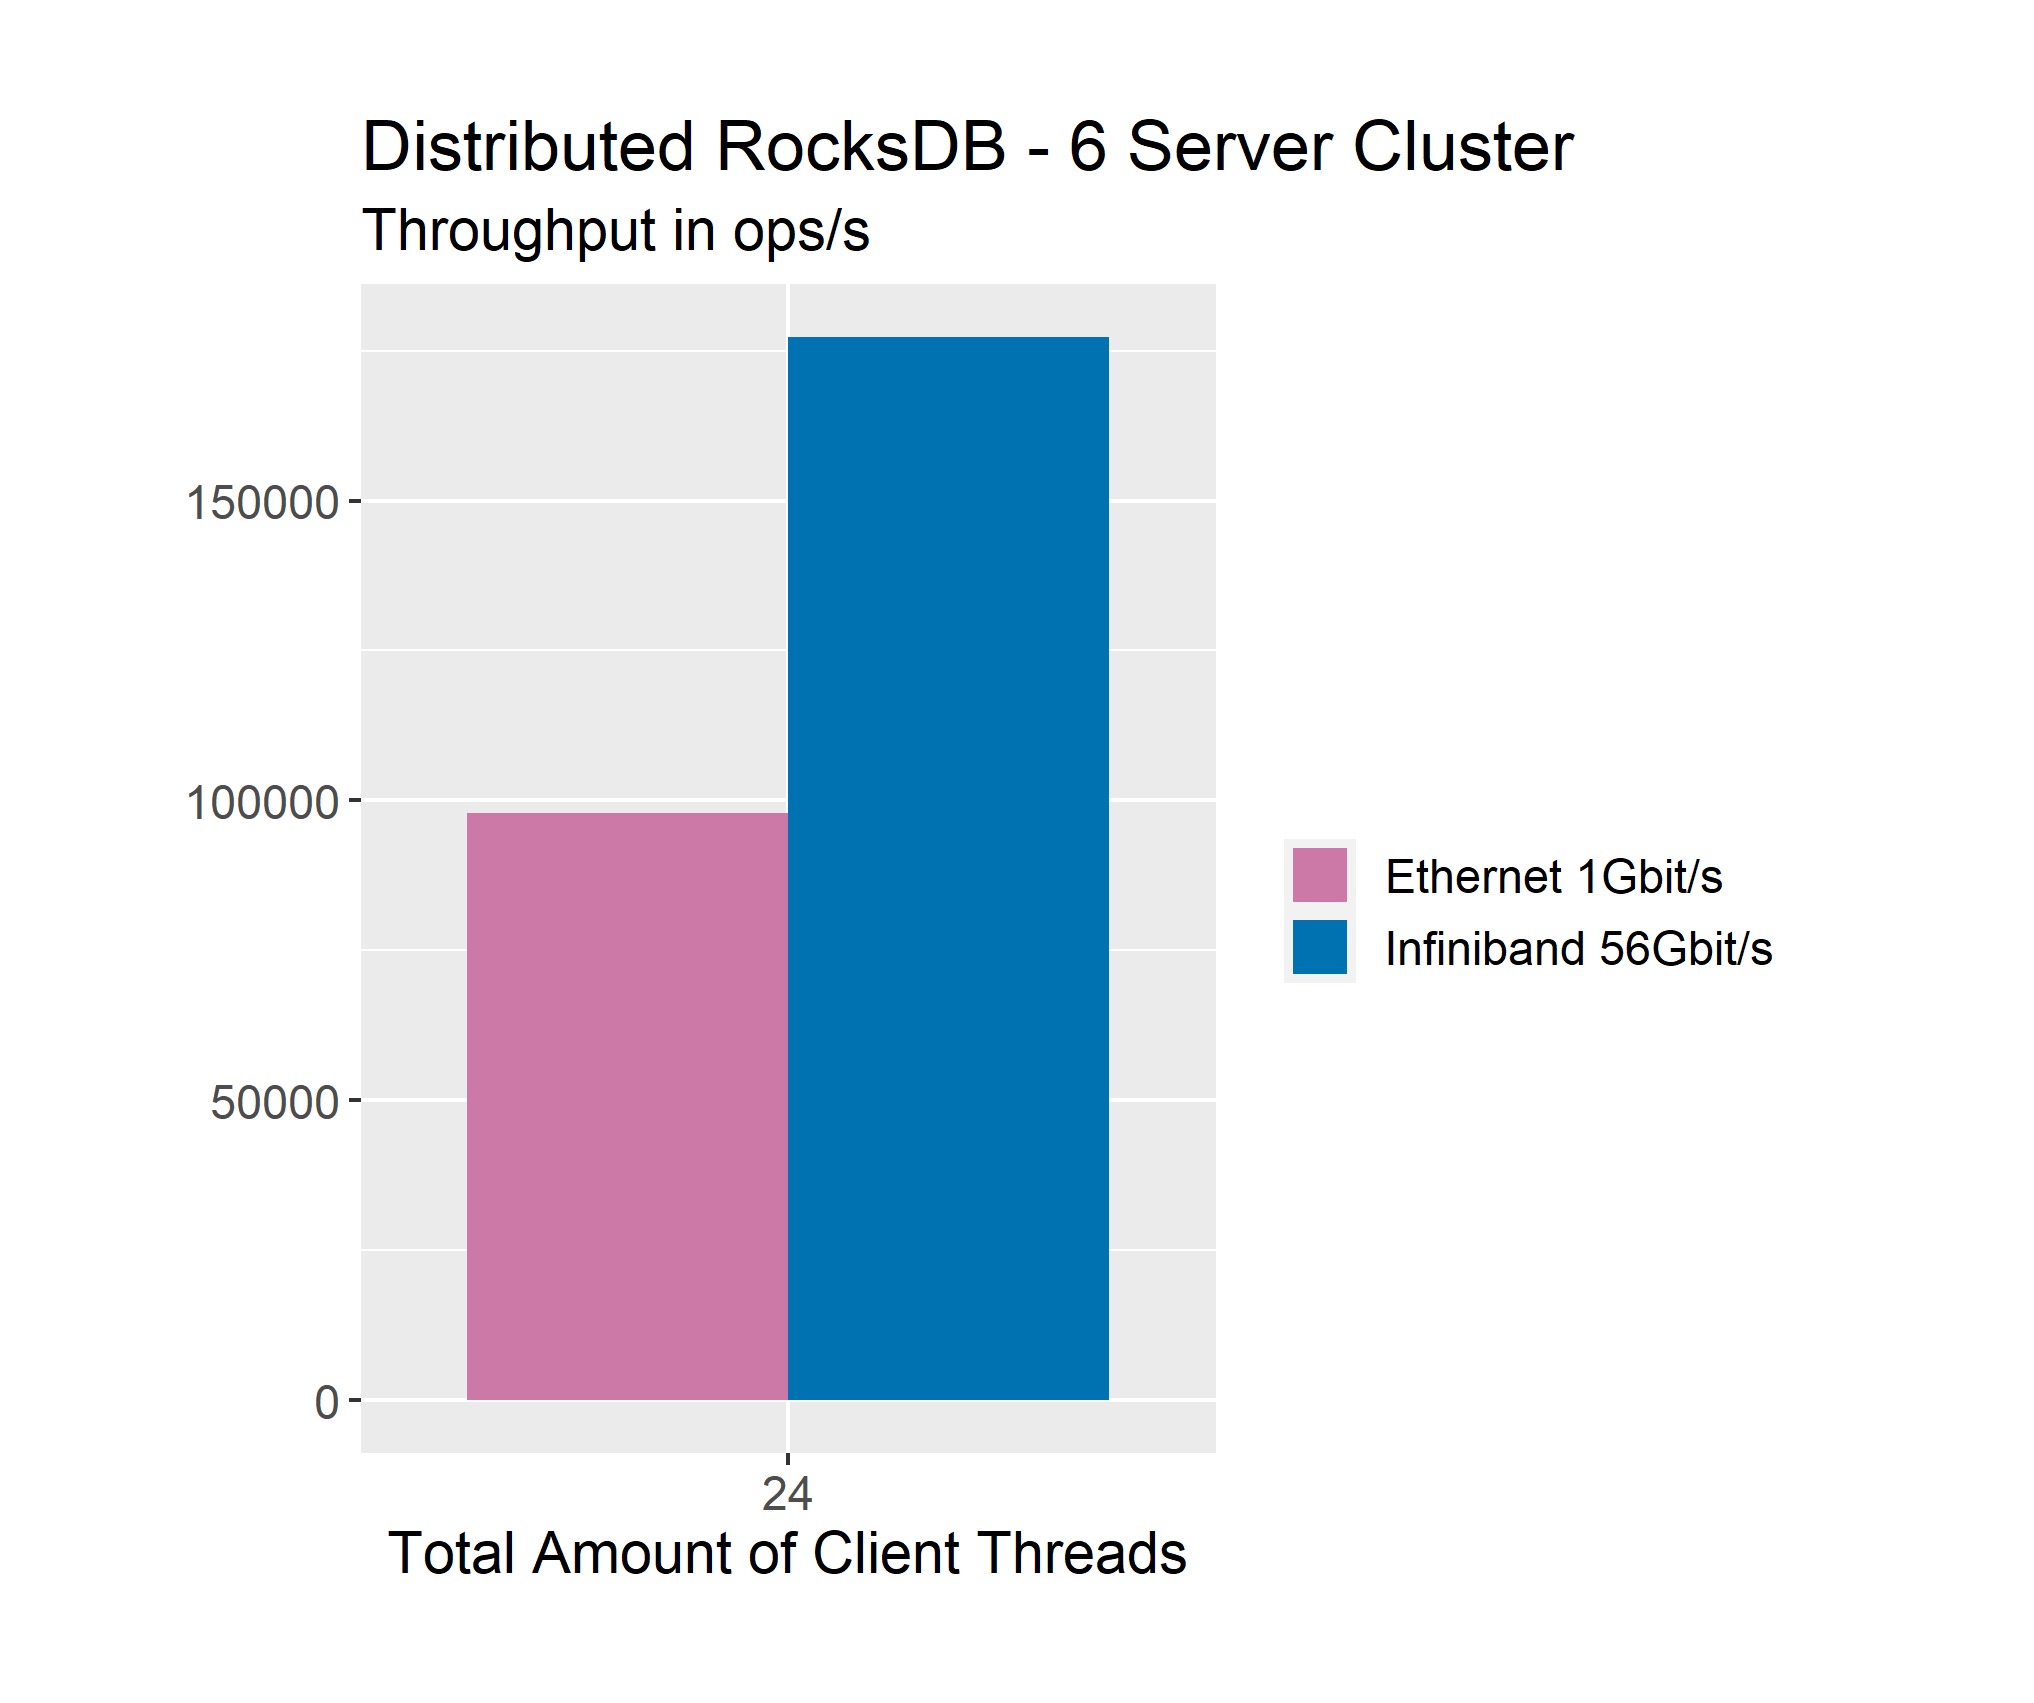
Our Ethernet-based cluster reaches a total throughput of almost 100.000 ops/s while the Infiniband-based cluster achieves roughly 175.000 ops/s. Unfortunately only 1Gbit/s Ethernet was available. Another comparison with more powerful Ethernet connections would be nice in the future. Regardless, let us look at latency as well.
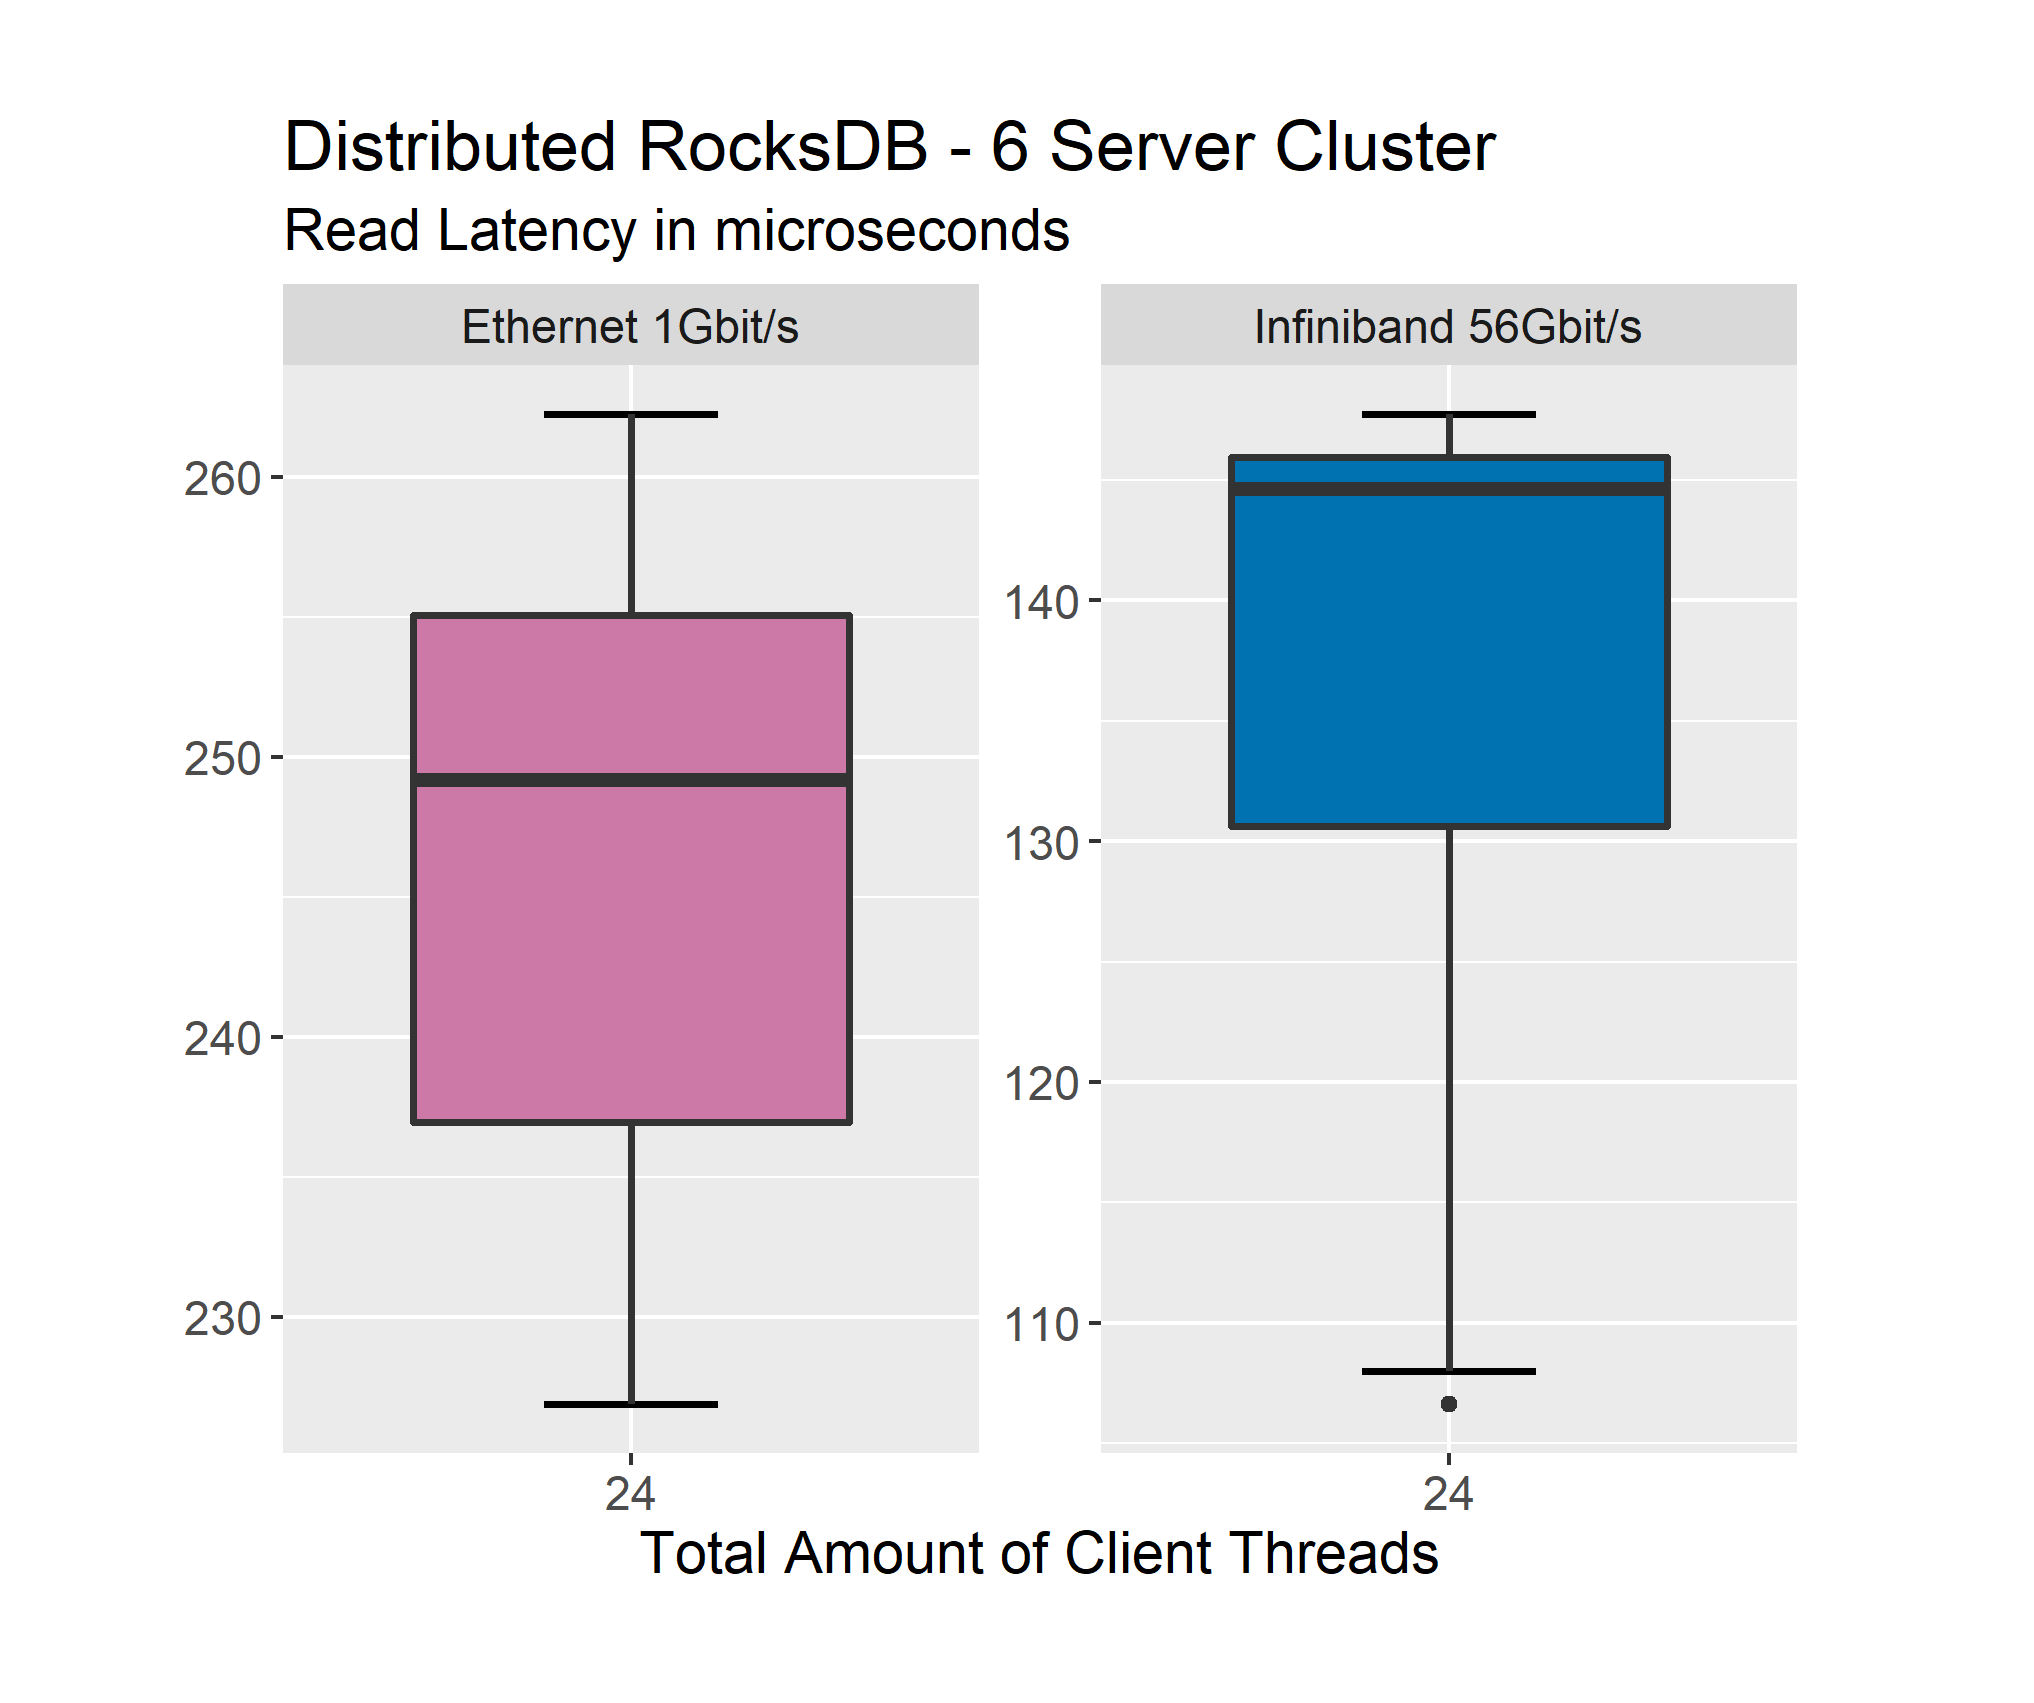
The Ethernet-based cluster has a median of 249 microseconds. The quantiles span from 255 to 237 microseconds. Minimum and maximum values are 227 and 262 respectively. The Infiniband-based cluster has a median of 145 microseconds. The quantiles span from 131 to 146 microseconds. Minimum and maximum values are 107 and 148 respectively.
So the span from minimum and maximum is 35 microseconds for the Ethernet-based cluster and 41 microseconds for the Infiniband-based cluster. The Ethernet-based cluster has a smaller total span. However, when one looks at the span of the quantiles, the Ethernet-based cluster has a span of 18 microseconds while the Infiniband-based cluster has a span of 15 microseconds. So while the Infiniband-based cluster performs better performance-wise, there is no clear winner in regards to consistency. These results are very similar for update latency.
Cluster Scalability
The next experiment we will talk about in this article is regarding cluster scalability. With an increase in cluster size, we want linear scaling optimally.
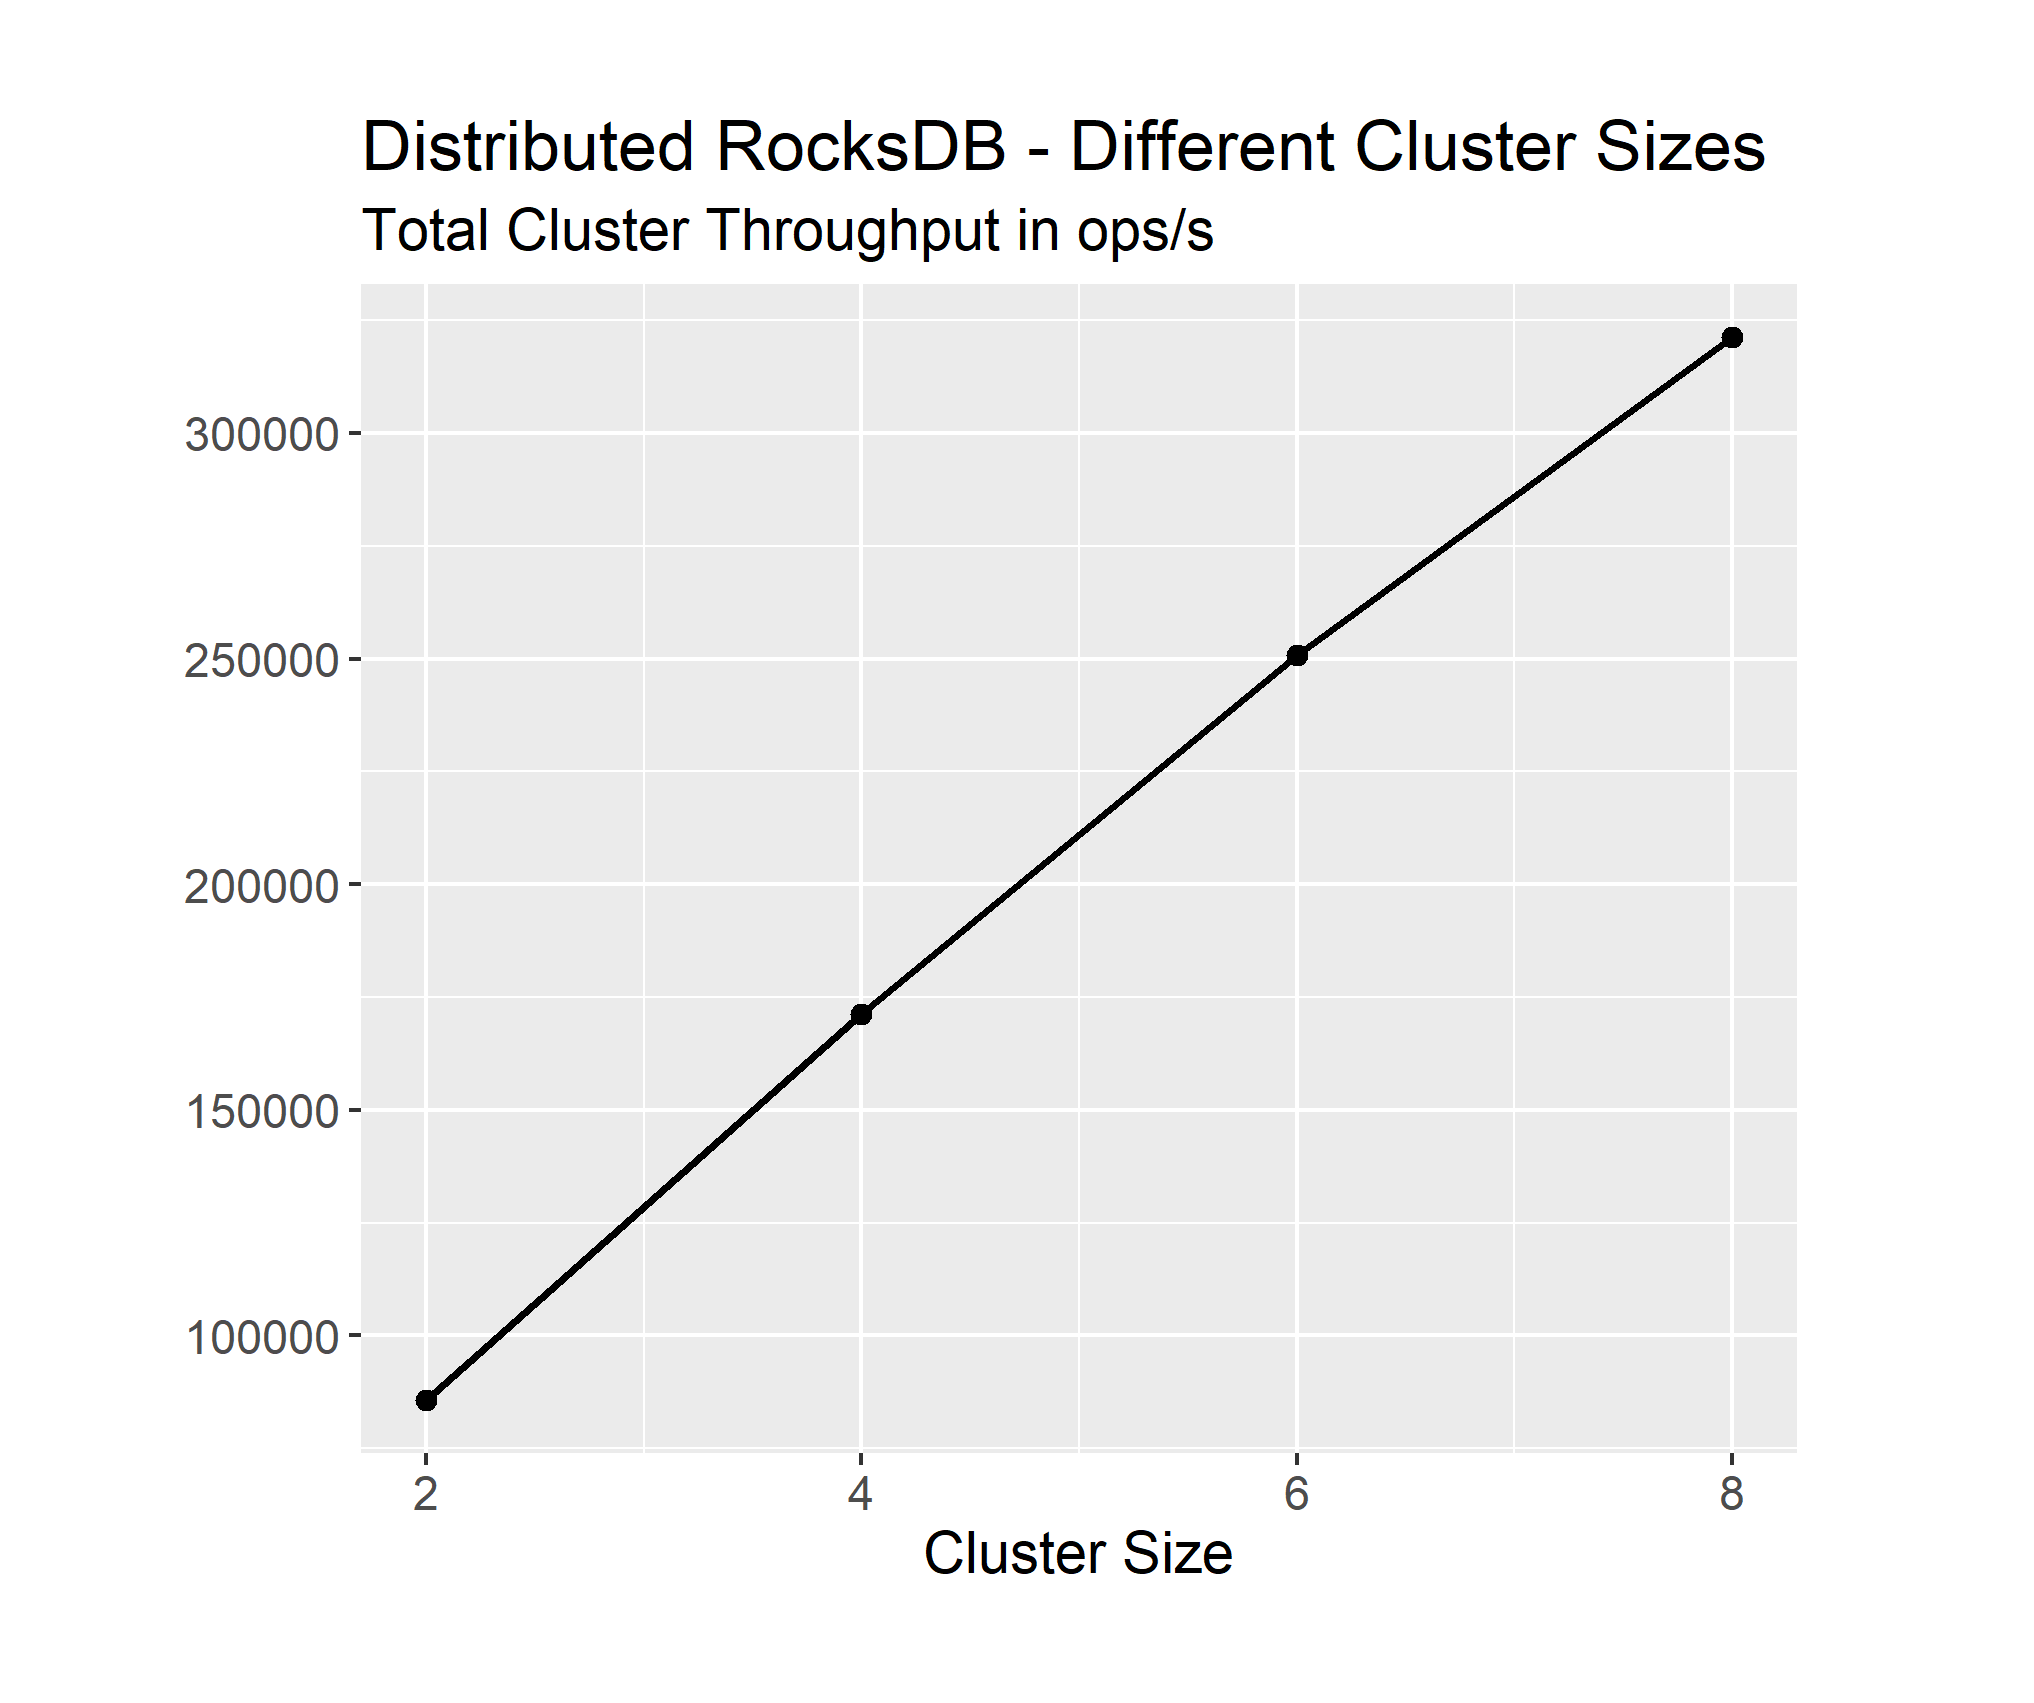
From the total throughput, we can already tell that it is not perfectly linear. We can analyze this in more detail by looking at the average throughput of each node in the cluster.
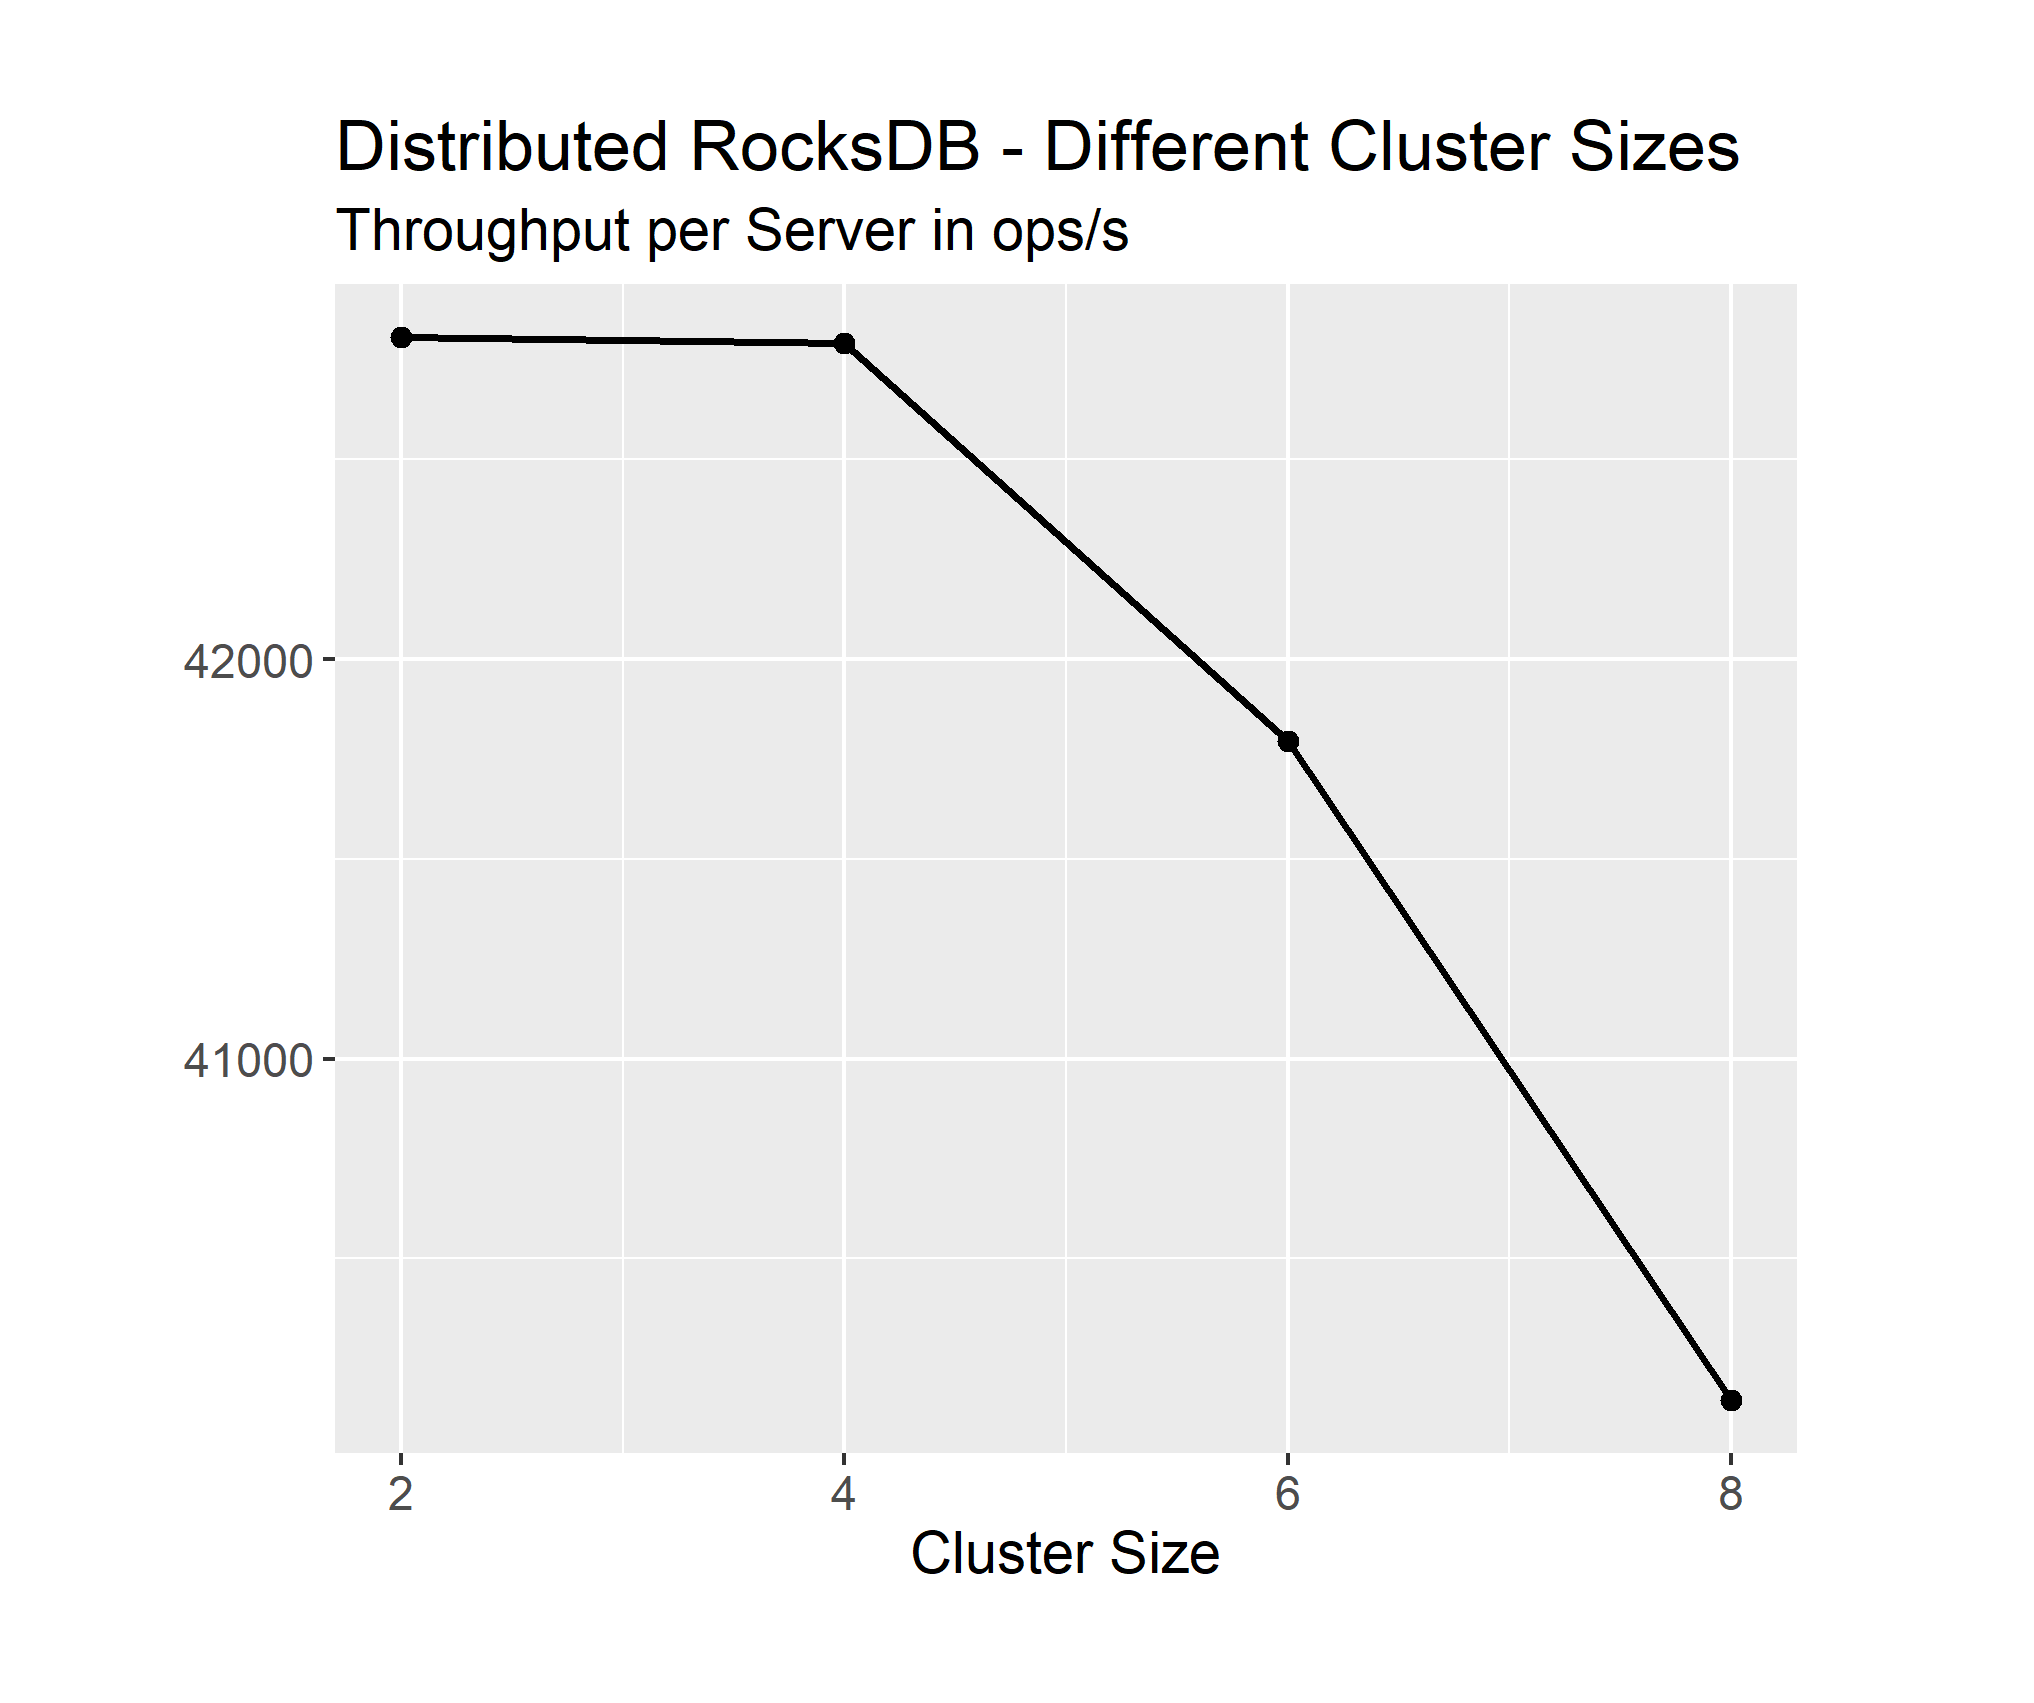
Here we can see, that while an increase from 2 to 4 nodes hardly changes the performance, we see bigger dips for 6 and 8 nodes. Our average throughput in ops/s per node decreases from more than 43.000 to almost 39.000 from 2 to 8 nodes. Unfortunately, we did not have access to even bigger clusters, which would have been interesting to see.
Amazon Web Services Cluster
At this point of my thesis, we were running low on time. We still wanted to have a rough estimate about how we line up against industrial-grade alternatives. We had no time to run such alternatives on our own cluster. Instead, we used a paper from 2018 as a reference value. This paper is from Altoros. It benchmarked the following Databases as a Service: Couchbase Cloud, MongoDB Atlas, and Amazon DynamoDB. Altoros is a contributor to Couchbase, so we expect that they know their system the best and can extract maximum performance from it.
All the systems use AWS under the hood and the hardware is precisely described. Their benchmark with a 6 node cluster is recreated with Distributed RocksDB. An important difference is, that Altoros benchmarked with a field length of 10 and a field count of 1KB. So each transmitted package during the Altoros benchmark has a size of 10KB. Distributed RocksDB only supports field lengths of 1. So to get a close approximation, Distributed RocksDB was benchmarked with a field length of 1 and a field count of 10KB. So each transmitted package also has a size of 10KB.
Before seeing the results it is required to talk about bias. There is a bias that positively affects the results of Distributed RocksDB. The first one is that Distributed RocksDB has not implemented replication yet. So while the other systems use the industry standard of 3 replicas, Distributed RocksDB only uses 1 replica. The other systems are also more mature in that they implement server-failure-detection. Also, Distributed RocksDB does not support using different column families yet. How this is handled is explained in the YCSB implementation chapter. The result is that the communication protocol is simplified for Distributed RocksDB. With this bias in mind, one can look at the results.
| Database | Throughput in ops/s | Replicas | Source |
|---|---|---|---|
| Distributed RocksDB | 13014 | 1 | This Thesis (2022) |
| Couchbase Cloud | 33460 | 3 | Altoros Paper (2018) |
| MongoDB Atlas | 19144 | 3 | Altoros Paper (2018) |
| Amazon DynamoDB | 30404 | 3 | Altoros Paper (2018) |
Distributed RocksDB achieves a throughput of roughly 13.000 ops/s while Couchbase Cloud, MongoDB Atlas, and Amazon DynamoDB achieve throughputs of roughly 33.000, 19.000, and 30.000 ops/s respectively. Despite all the positive biases mentioned prior, Distributed RocksDB performs worse than all compared solutions. However, the compared solutions were all very mature products in 2018 already and as mentioned, the key to optimal performance seems to be a strong optimization for the use case in Meta’s opinion. Distributed RocksDB has not been optimized at all. Also, systems often group multiple client requests and transmit them at once, to achieve better performance. Distributed RocksDB does not implement such optimizations yet. There are many aspects of RocksDB that can be fine-tuned in future work. So the results are not to be interpreted negatively.
This experiment was run on Ethernet hardware. It would be nice to see how Distributed RocksDB compares to other systems when it can take advantage of Infiniband hardware. Amazon does not offer access to Infiniband hardware, unfortunately. Microsoft offers Infiniband hardware in their cloud services, but using Azure in addition to AWS exceeded the time we had during my thesis.
Conclusion
Building a distributed version of an already established key-Value Store was very interesting to me and I am glad I got the opportunity to have this as my Master’s Thesis topic. C++ can be tricky at times and I had some nasty bugs due to it. With some experience and code analysis features provided by modern IDEs, it is overall still fine to work with. Of course, it is not as simple as something like Python, but it should not be compared to it in the first place. Setting up your development environment can be very confusing, as there are many ways to do so and most documentations of projects expect you to already have a certain level of knowledge. I excluded those problems from this article since it is already very long as is, but I might come back to it in a separate one in the future.
There is a lot of potential future work to do. To improve performance the obsolete Connection Handler may be removed. Also moving to asynchronous communication should be possible without bigger architecture changes. Enhancing the communication protocol to support dealing with multiple keys in a single request is also an important aspect. Once that is done, the system should be optimized for the YCSB Workload A with RocksDB’s internal benchmarking tools. Rerunning these benchmarks afterwards would be interesting.
You can find the source code for the project here.